Embroidery Thread Tension: How Tight Should Your Stitches Be?
Good embroidery tension means each stitch lies flat on the fabric without lifting or pulling the cloth in. Learn what to look for, how the hoop helps and a short drill to train your hands.
Run a fingertip across a row of your stitches. If the thread lifts and catches on your nail, the stitches are too loose. If the fabric dips and ripples beside them, they are too tight. Good tension is the narrow middle ground, where each stitch rests on the surface of the cloth and the cloth stays flat, and it is a matter of feel that anyone can learn with a little deliberate practice.
What Good Tension Looks Like
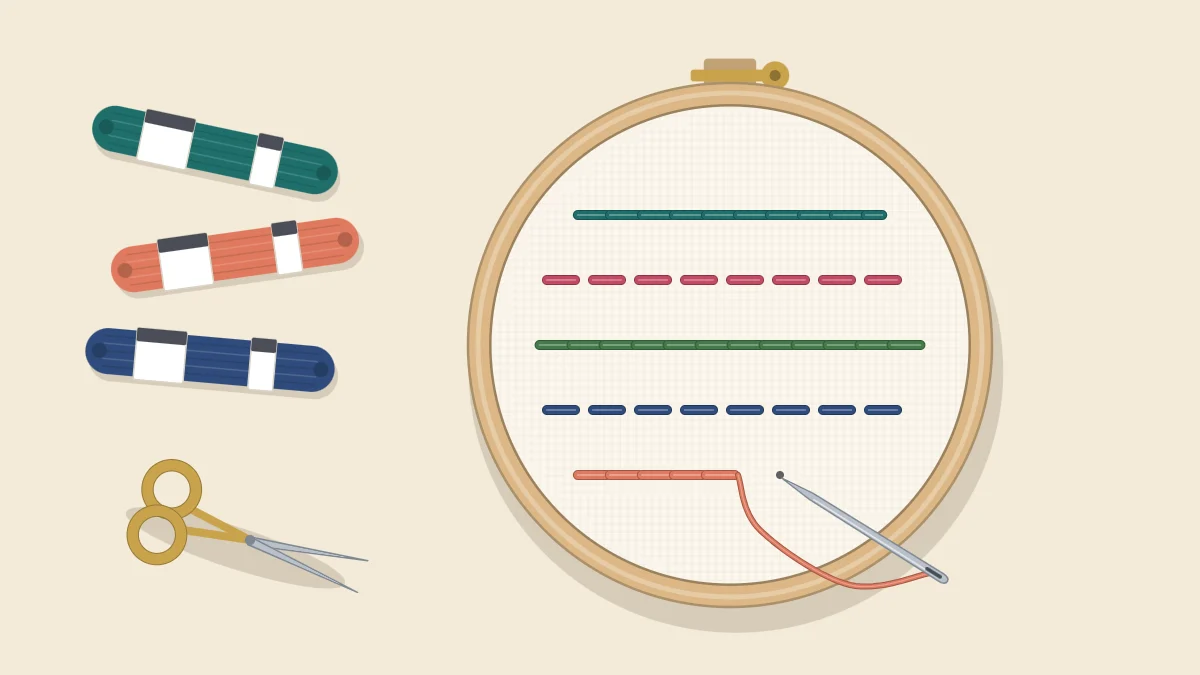
“Tension” in hand embroidery means how firmly the working thread is pulled at the end of each stitch. The three rows below show the range.
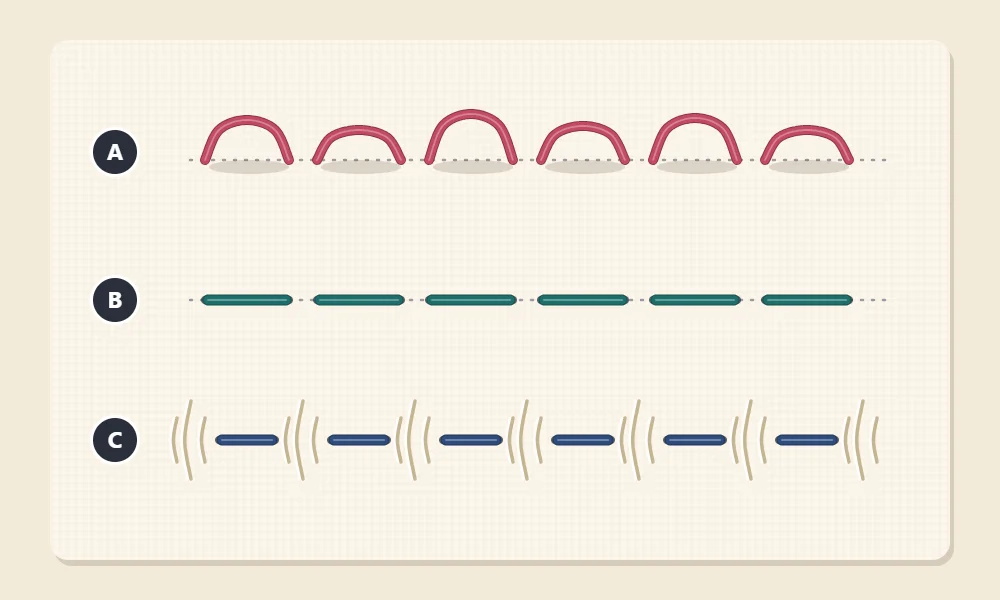
- Row A, too loose. The stitches arch up from the fabric in small loops. They look uneven, snag on things, and shift out of place when the piece is handled or washed.
- Row B, even. Each stitch lies flat against the fabric along its whole length. The cloth around it is smooth. This is the target.
- Row C, too tight. The thread is shorter than the distance it has to cover, so it drags the fabric in. Small wrinkles form around the stitches, and the stitches themselves look thin and sunk into the cloth.
Row C is the more common beginner habit, because pulling firmly feels secure. It is also the harder one to correct afterward. Slack stitches can sometimes be eased tighter from the back; an area that has been pulled in usually needs the steps in how to fix puckered embroidery.
Start With the Hoop
Thread tension is only half of the picture. The fabric needs tension too, and the hoop supplies it.
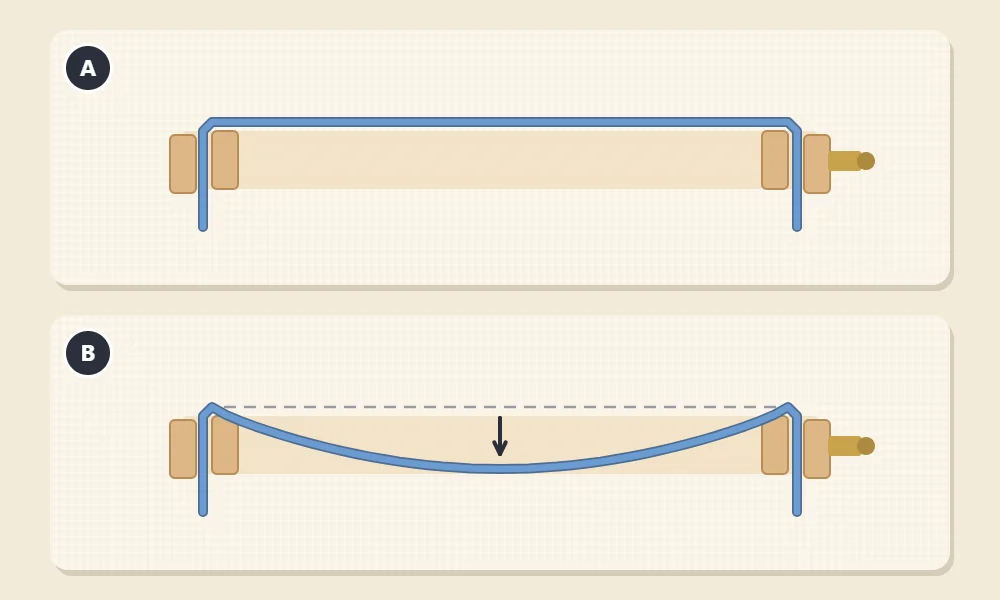
In hoop A the fabric is stretched flat. It resists the pull of the thread, so when you draw a stitch down it stops at the surface. That resistance is what lets you feel the right moment to stop pulling. In hoop B the fabric sags. It gives way under each stitch, so there is nothing firm to pull against: either you stop early and leave a loop, or you keep pulling and gather the slack cloth into the stitch. When that fabric is later smoothed out, the stitches no longer fit it.
The usual check is to tap the hooped fabric with a fingertip. It should feel firm and springy, like a small drum, with no ripples. Fabric loosens as you work, so check it every so often and retighten. The full method, including tightening in stages, is in how to put fabric in an embroidery hoop.
Watch out
Firm does not mean stretched out of shape. Pull the fabric gently and evenly so the weave stays straight. Fabric that is distorted in the hoop relaxes when it comes out, and the stitching can wrinkle even if every stitch was pulled correctly.
How Far to Pull Each Stitch
The rule is short: pull until the thread just lies on the surface of the fabric, then stop. A few habits make that easier to do consistently.
- Slow down for the last inch. Draw most of the thread through at a normal pace, then ease the final inch or so (2 to 3 cm) through gently while watching the stitch settle.
- Pull in the direction of the stitch. Drawing the thread along the line you are stitching lays it down smoothly. Pulling straight up or sideways tugs the fabric.
- Use the stab method while you are learning. Take the needle straight down through the fabric and pull it through from the back, then bring it straight up for the next stitch. Working in two separate movements gives you a clear look at each stitch as it tightens.
- Look at the fabric, not just the thread. The moment the cloth beside a stitch starts to dimple, you have gone slightly too far. Slide the needle under the stitch and lift it a touch to release it.
Different stitches need slightly different handling. Looped stitches such as chain stitch should keep a soft, rounded loop, so they are pulled less than a flat line stitch. Long stitches such as satin stitch are the most sensitive of all: many long, parallel stitches side by side add up, and a little too much pull on each one draws the whole shape in.
Keep the Thread From Twisting
Every stitch puts a small amount of twist into the working thread. After a dozen stitches the floss starts to kink, coil back on itself and form little loops near the fabric. A twisted thread will not lie flat however carefully you pull, and the strands bunch into a cord instead of spreading side by side.
The fix takes a few seconds. Let go of the needle and let it hang freely from the fabric. It will spin as the thread unwinds; when it stops, carry on. Do this whenever you see the floss start to kink. Shorter thread helps as well: a length about as long as your forearm twists far less than a long one. Overlong thread is near the top of the list of common embroidery mistakes for exactly this reason.
Tip
If a small loop forms on the back as you pull, stop before it tightens into a knot. Put the needle through the loop and pull it gently toward the fabric, and it will usually slip free.
A Ten-Minute Tension Drill
Tension is muscle memory, and it builds fastest on a scrap where nothing is at stake. This drill uses plain running stitch so you can concentrate on the pull alone.
- Hoop a scrap of plain cotton so it is drum-tight, like hoop A, and draw three straight pencil lines about 3 inches (8 cm) long.
- Thread a needle with two strands of floss, about a forearm’s length.
- On the first line, stitch deliberately too loose. Leave each stitch arched off the fabric so the row looks like row A.
- On the second line, stitch deliberately too tight. Pull until the fabric wrinkles, as in row C, and notice how much force that takes.
- On the third line, aim between the two. Ease each stitch down until it just touches the fabric and stop, as in row B.
- Run a fingertip along all three rows, then turn the hoop over and look at the back, where uneven tension shows clearly.
- Take the scrap out of the hoop and lay it flat. The tight row will ripple; the even row should stay smooth.
Feeling both extremes on purpose makes the middle much easier to find. Repeat the third row a few times, then try the same exercise with backstitch, where every stitch meets the one before and uneven pulling is easy to spot.
Quick Checks While You Stitch
- Tap the fabric: still firm? If not, retighten the hoop.
- Glance across the surface at a low angle: any loops standing up, or any dimples?
- Is the thread kinking? Let the needle hang and untwist.
- Are your hands tense? A tight grip tends to produce tight stitches. Loosen your shoulders and hold the hoop lightly.
Frequently asked questions
Why are my embroidery stitches loose and loopy?
Usually the fabric is slack in the hoop, so there is nothing firm to pull against, or the thread has twisted and will not lie flat. Retighten the hoop and let the needle hang to untwist the floss.
Can I fix a stitch that I pulled too tight?
If you notice right away, slide the needle under the stitch and lift it slightly to give back a little thread. For a whole area that has drawn in, it is usually better to unpick and restitch it.
Does the number of strands affect tension?
Yes. More strands make a thicker thread that needs a little more room and a gentler pull to lie flat, and they show twisting more clearly.
Should I keep the fabric in the hoop between sessions?
It is generally better to loosen or remove the hoop when you stop for the day, because fabric left tightly hooped for a long time can crease or stretch. Retighten it fully before you stitch again.