Running Stitch: The Easiest Embroidery Stitch to Learn First
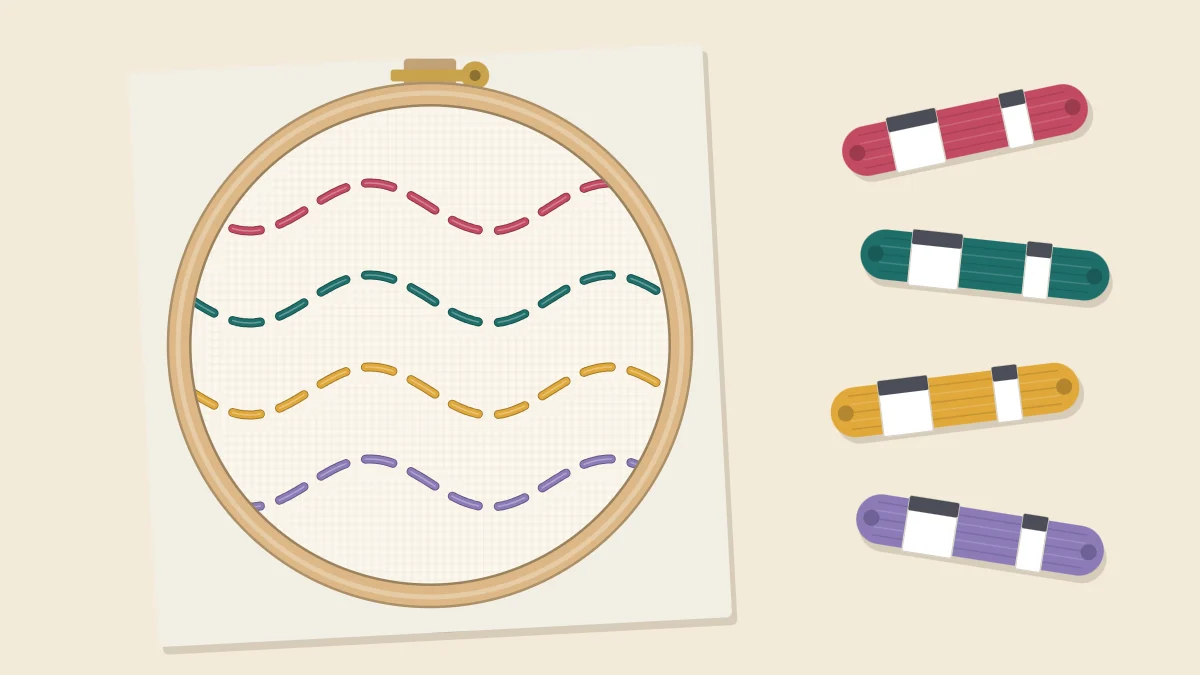
Running stitch is a simple dashed line and the natural first stitch for a beginner. Learn the four numbered points, how to keep stitches and gaps even, and three easy variations.
Tutorial at a glance
Materials
- Plain woven cotton or cotton-linen fabric
- 6-inch (15 cm) embroidery hoop
- Embroidery needle
- Six-strand cotton floss in two colors
- Pencil or water-soluble pen
- Small scissors
Running stitch is a dashed line. The needle goes up and down through the fabric along a marked line, leaving a stitch on the surface, then a gap, then another stitch. It is the same motion as basic hand sewing, which is why it is usually the first embroidery stitch a beginner learns. There is nothing to wrap or loop, so all your attention can go to the one thing that makes it look good: even spacing.
What You Need to Practice
Plain woven cotton or a cotton-linen blend held taut in a hoop is ideal. A 6-inch (15 cm) hoop is a comfortable size to hold. Draw three or four straight lines and one gentle wave across the fabric with a sharp pencil or a water-soluble pen, so you have something to follow.
Cut a piece of floss about as long as your forearm. Two or three strands is a good starting point for a line that is easy to see. If you have not split floss before, the guide on how to separate embroidery floss shows how to pull strands out without a tangle. Thread the needle, leave a short tail, and knot the long end or use one of the knot-free starts described in how to start and end embroidery thread.
How to Work Running Stitch Step by Step
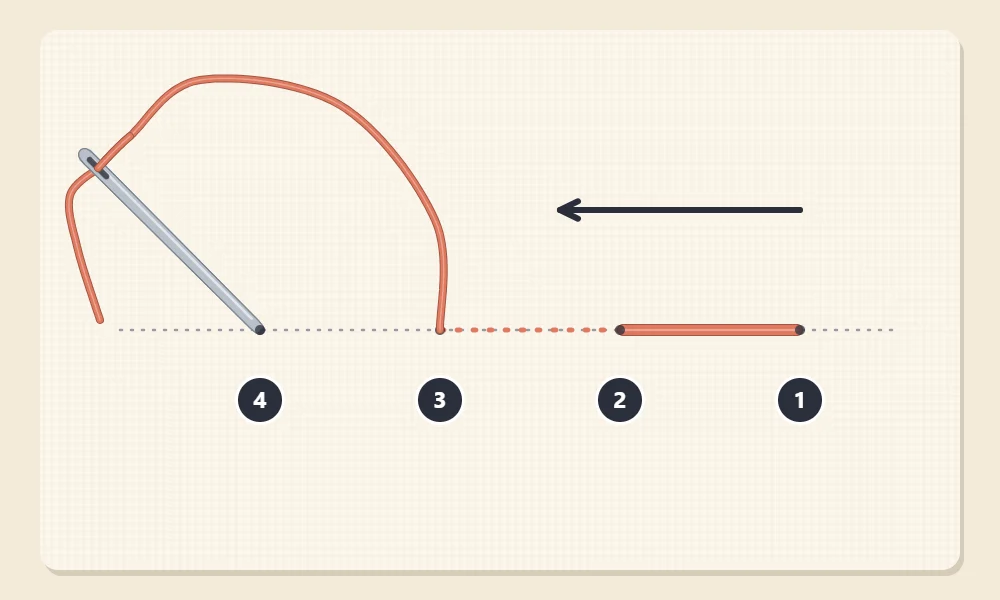
You can stitch in whichever direction feels natural. Many right-handed stitchers work from right to left and many left-handed stitchers from left to right. The numbers below match the diagram.
- Come up at 1. Bring the needle up from the back of the fabric at the start of your line. Pull the floss through until the knot or anchor stops it.
- Go down at 2. Move one stitch length along the line and push the needle straight down. About 1/8 to 3/16 inch (3 to 5 mm) is a good practice length. Pull the floss through until the stitch lies flat on the fabric.
- Come up at 3. On the back, travel the same distance again along the line and bring the needle up. The space between 2 and 3 is the gap, and it should be as long as the stitch you just made.
- Go down at 4. Make the second stitch the same length as the first. You now have two stitches and one gap, all equal.
- Repeat to the end of the line. Keep the rhythm of up, down, up, down. Finish with the needle on the back and secure the floss by weaving it under a few stitches there.
Stab Method or Sewing Method
There are two ways to move the needle, and both produce the same stitch.
| Method | How It Works | Good For | Keep in Mind |
|---|---|---|---|
| Stab method | One movement at a time: straight down, pull through, straight up, pull through. | Fabric held tight in a hoop, careful spacing, beginners. | Slower, because each stitch takes two pulls. |
| Sewing method | The needle weaves in and out of the fabric, picking up two or three stitches before you pull through. | Long straight lines, fabric held in the hand or loosely hooped. | Hard to do on drum-tight fabric, and the gaps tend to come out shorter than the stitches. |
Start with the stab method. It lets you place every point exactly where you want it, and it keeps the fabric flat. Once your spacing is steady, try the sewing method on a long straight line to feel the difference.
How to Keep Stitches and Gaps Even
Evenness comes from practice, but a few habits speed it up.
- Mark the spacing. For your first rows, put small dots along the line at regular intervals and stitch from dot to dot.
- Use the needle as a ruler. Pick a visual reference, such as the width of the needle’s eye, and match each stitch to it.
- Look back, not ahead. Before the needle goes down, compare the new stitch with the one beside it.
- Stay on the line. Push the needle through the marked line itself, not beside it, or the row will wobble.
- Pull just enough. Stop pulling when the floss lies flat on the surface. The guide to embroidery thread tension explains what that should look and feel like.
Watch out
Running stitch gathers fabric very easily, because the floss slides freely through every hole. If the line of stitching looks shorter than the line you drew, or the fabric ripples, you are pulling too hard. Smooth the fabric flat along the row with a fingertip before you carry on.
Stitching Curves
A straight stitch cannot bend, so a curve is really a series of short straight segments. The tighter the curve, the shorter the stitches and gaps need to be. On a gentle wave you can keep your usual length. On a small circle, cut the length to about half. Shorten the stitches gradually as you enter a curve and lengthen them again as the line straightens, so the change is not obvious.
Three Variations to Try
Once the basic row feels easy, small changes give you very different lines.
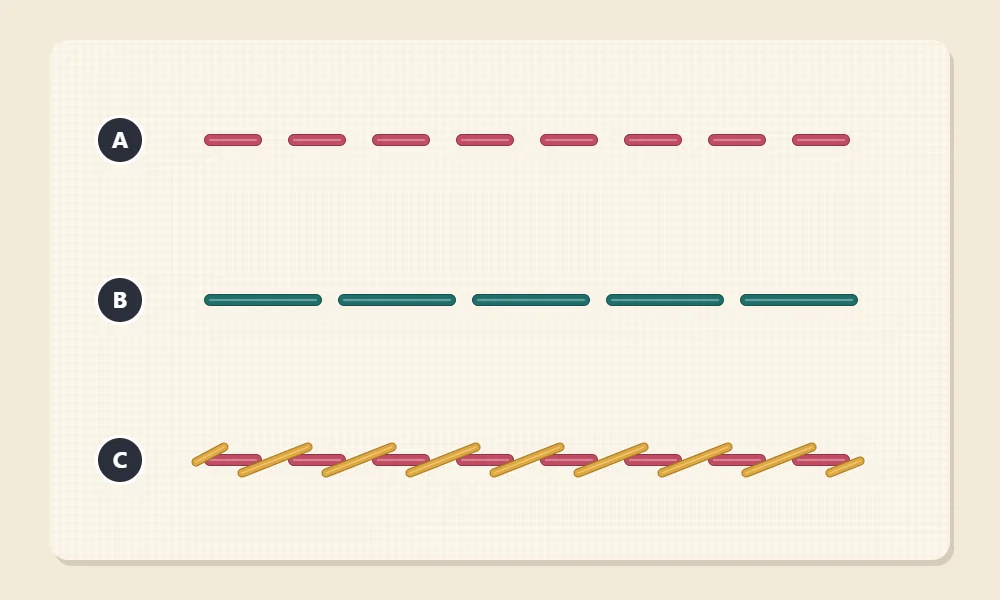
- A: standard running stitch. Stitches and gaps are equal. This is the row to master first.
- B: long stitches with short gaps. Make each stitch two or three times as long as the gap. The line looks heavier and more solid, which suits borders and stems.
- C: whipped running stitch. Work a standard row, then thread a second color. Bring it up at the start of the row and slide the needle under each stitch in turn, always from the same side, without piercing the fabric. The second color wraps around the stitches and turns the dashes into a twisted cord. Sliding the eye end of the needle under the stitches first helps avoid catching the fabric.
A related idea is threaded running stitch. Instead of wrapping in one direction, the second floss passes down under one stitch and up under the next, making a soft wave along the row. As with whipping, the second floss only goes through the fabric at the two ends of the line.
Where to Use Running Stitch
Running stitch gives a light, open line. It works well for borders around a design, for simple outlines that should not look heavy, for rain, dotted paths and stitched “trails” behind small motifs, and for rows of texture that fill a background. Several rows worked close together, with the stitches of one row sitting beside the gaps of the next, make a simple brick-like filling.
It is also the natural first row of a practice piece. The first embroidery sampler starts with it for exactly that reason.
Fixing Common Problems
- Uneven lengths. Slow down and use dots for a few rows. Unevenness usually fades after a short session of practice.
- Rippled fabric. Ease the stitches looser with the needle tip and check that the fabric is tight in the hoop.
- A wandering line. Redraw the guide line darker and bring the needle up exactly on it each time.
- Twisting floss. Let the needle hang freely from the fabric for a moment so the floss can unwind.
When your dashed rows look regular, the next stitch to learn is backstitch, which uses the same up-and-down movement to close the gaps and make a solid line.
Frequently asked questions
How long should a running stitch be?
About 1/8 to 3/16 inch (3 to 5 mm) is a good length for practice. Shorter stitches suit curves and small designs, and longer ones suit bold borders.
Should the gaps be the same length as the stitches?
In the standard version, yes. You can deliberately make the gaps shorter than the stitches for a heavier line, as long as you keep the pattern consistent along the row.
How many strands of floss should I use for running stitch?
Two or three strands is a good starting point. Use one strand for a very fine line and four to six for a chunky one.
Why does my fabric pucker when I use running stitch?
The floss is being pulled too tight, which gathers the fabric along the row. Stop pulling as soon as each stitch lies flat, and keep the fabric tight in the hoop.