Lazy Daisy Stitch: Easy Petals and Leaves
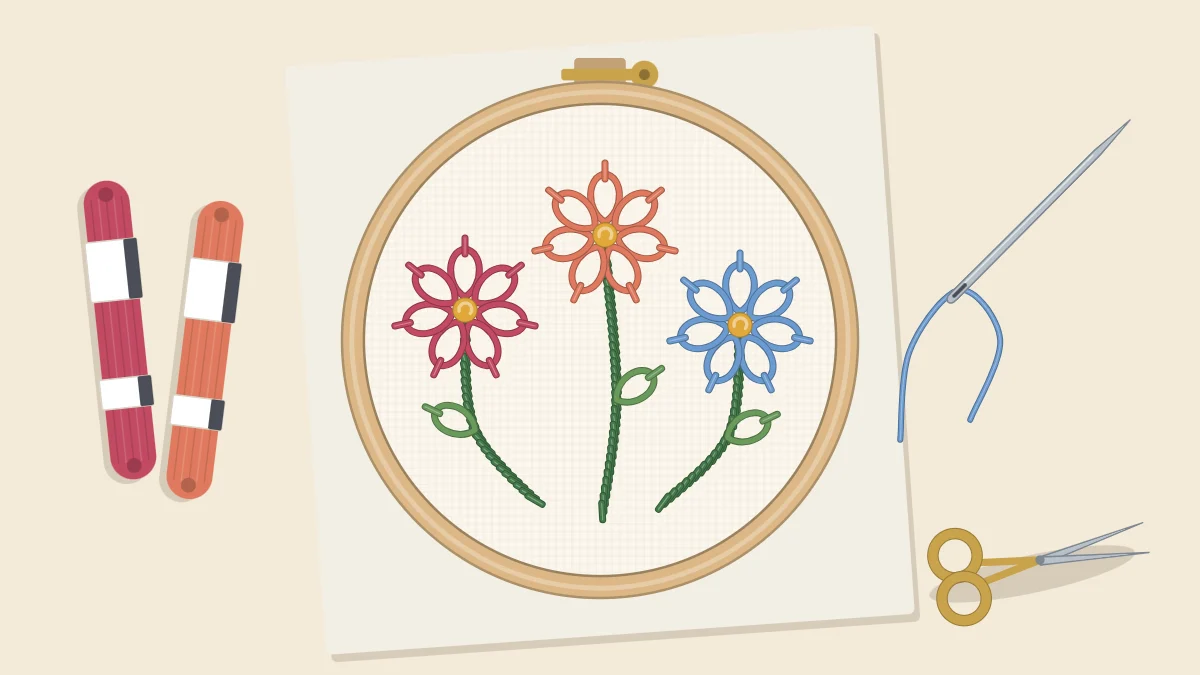
Lazy daisy stitch is a single anchored loop that makes an instant petal or leaf. Learn the three numbered points, then build a five-petal flower around a center.
Tutorial at a glance
Materials
- Plain woven cotton fabric
- 6-inch (15 cm) embroidery hoop
- Embroidery needle
- Six-strand cotton floss in two or three colors
- Pencil or water-soluble pen
- Small scissors
One loop of floss, pinned down at its tip with a tiny stitch, makes a teardrop shape that reads instantly as a petal or a small leaf. That is all lazy daisy stitch is. Its other name is detached chain stitch, because each petal is a single chain link worked on its own instead of being joined into a row. Arrange five or six of them around a center and you have a flower in a couple of minutes.
What You Need
Hoop a piece of plain woven cotton so it is taut. Use two or three strands of floss as a starting point: fewer strands make a delicate, open petal and more strands make a fuller one. A water-soluble pen or sharp pencil is useful for marking dots, since a flower needs only a center mark and a mark for each petal tip.
How to Stitch One Petal Step by Step
Practice single petals in a row before you try a flower. The numbers match the diagram.
- Come up at 1. Bring the needle up from the back at the base of the petal, which is the end nearest the flower center. Pull the floss all the way through.
- Go back down at 1. Push the needle down into the same hole, or one fabric thread beside it. Pull slowly and stop while a loop is still lying on the surface.
- Come up at 2, inside the loop. Bring the needle up where you want the tip of the petal to be, about 1/4 inch (6 mm) from point 1 for a first try. The needle must come up inside the far end of the loop, so the floss of the loop lies under the needle.
- Shape the loop. Pull the floss through gently until the loop rests against it and lies flat as a rounded teardrop. Stop before it tightens into a thin line.
- Go down at 3. Take the needle down just outside the loop, right over its tip. This makes a tiny anchoring stitch that holds the petal in place.
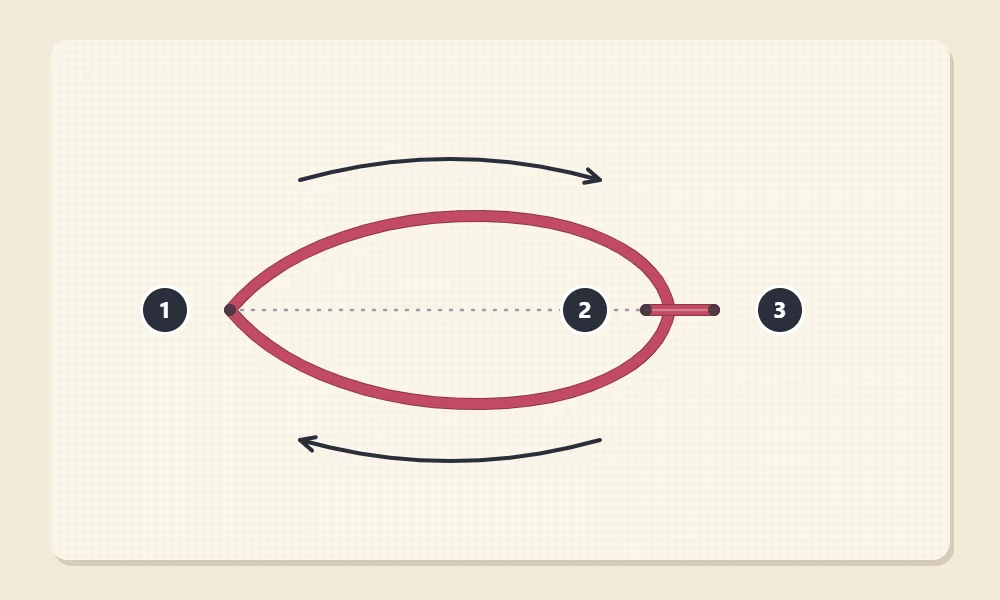
The movement is the same as the first link of chain stitch, followed straight away by the small stitch that normally ends a chain.
Watch out
If the needle comes up outside the loop at point 2, the loop will be pulled through to the back and vanish. Hold the loop flat with the thumb of your other hand until the needle tip is clearly inside it.
Getting the Tension Right
Tension decides the shape of the petal more than anything else.
- Pulled too tight, the two sides of the loop close together and the petal becomes a narrow line with no opening.
- Left too loose, the loop is floppy, sits unevenly and can catch on things.
- Just right, the loop lies flat on the fabric with a small open space inside it, and it does not shift when you brush a finger across it.
The length of the anchoring stitch matters too. A very short one gives a rounded tip. A slightly longer one draws the tip out into a point, which is handy for leaves. If your petals come out in different shapes, the guide to embroidery thread tension has a practice drill that helps you pull each stitch by the same amount.
Building a Flower Around a Center
A daisy is a ring of petals that all begin near the same center point and radiate outward.
- Mark the center. Draw a small dot where the middle of the flower will be.
- Mark the petal tips. For a five-petal flower, place five dots in a circle around the center, evenly spaced, each about 1/4 to 3/8 inch (6 to 10 mm) from it.
- Stitch petal 1. Come up close to the center dot, form the loop, come up inside it at the first tip mark and anchor it.
- Work around the center in order. Stitch petals 2, 3, 4 and 5, moving round the circle one after another. Each petal starts beside the center dot and ends at its own tip mark.
- Add the center. Finish with one or more French knots in the middle, in a contrasting color.
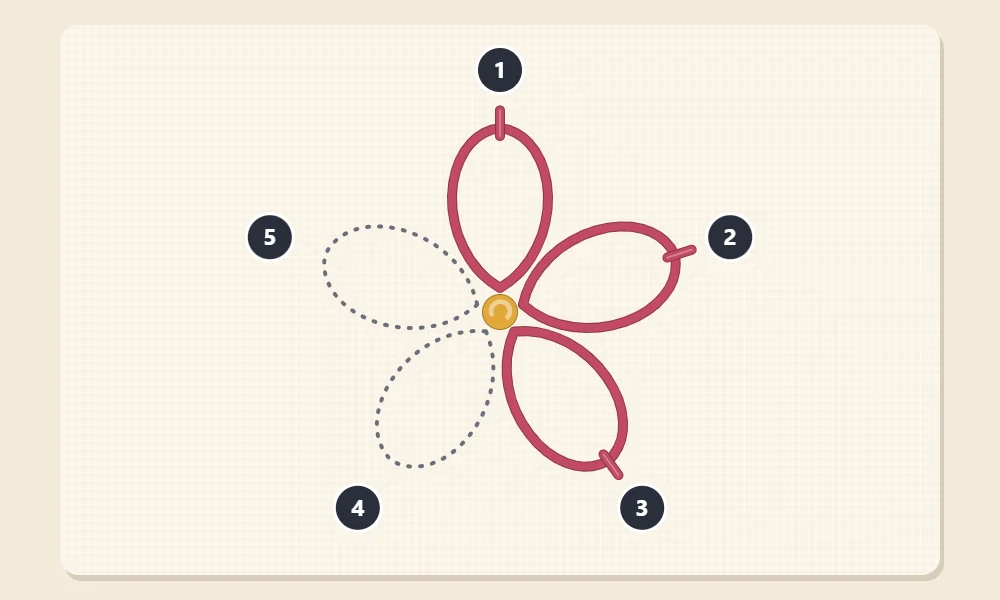
Do not start every petal in exactly the same hole. So many threads through one spot enlarge the hole and can let the fabric tear or the stitches loosen. Instead, start each petal a tiny distance out from the center dot, leaving a small open circle in the middle. The French knot covers it neatly.
Tip
The short thread that passes from the tip of one petal back to the center lies on the back of the fabric. On thin, pale fabric a dark floss may show through faintly, so choose a medium-weight fabric for flowers in strong colors.
Petal Count and Spacing
Five petals is the easiest number to space by eye and gives an open, simple flower. Six or eight petals make a fuller daisy. The more petals you add, the narrower each one needs to be, or they will crowd and overlap at the base.
| Petals | Look | Spacing Aid |
|---|---|---|
| 4 | A simple cross-shaped blossom. | Mark the tips like the points of a compass. |
| 5 | An open, natural-looking flower. | Mark five dots like the points of a star. |
| 6 | A fuller daisy. | Mark top and bottom, then two dots on each side. |
| 8 | A dense, round daisy. | Mark four compass points, then one dot between each pair. |
Slightly uneven petals are part of the charm of hand stitching. Aim for petals of similar length and a roughly even gap between them, and the flower will read correctly.
Lazy Daisy Leaves
The same stitch makes quick leaves. Work single loops along a stem, slanting each one away from the stem in the direction of growth, either in pairs opposite each other or alternating from side to side. Make the anchoring stitch a little longer to give each leaf a pointed tip. For a more solid leaf, add one straight stitch down the middle of the loop, from base to tip, in the same color.
Leaves like these along a line of stem stitch form the base of the simple floral wreath, and the same petals and leaves appear throughout the spring flower hoop.
Common Problems and Fixes
- Petals of different sizes. Mark the tip of every petal before you stitch, and come up exactly on the mark.
- Thin, closed petals. Ease off the pull. Stop as soon as the loop touches the thread at point 2.
- A petal that leans to one side. The anchoring stitch went down beside the tip instead of directly over it. Place point 3 in line with points 1 and 2.
- A twisted loop. Let the needle hang to untwist the floss, and smooth the loop flat before you anchor it.
Frequently asked questions
Is lazy daisy stitch the same as detached chain stitch?
Yes. Each petal is a single chain stitch loop that is anchored on its own with a tiny stitch instead of being linked to another loop.
How many petals should a lazy daisy flower have?
Five is the easiest to space and gives an open flower. Six or eight petals make a fuller daisy, as long as each petal is kept narrow enough not to crowd its neighbors.
Why do my lazy daisy petals look like thin lines?
The loop is being pulled too tight. Stop pulling as soon as the loop rests against the thread at the tip, so a small open space stays inside the petal.
Should all the petals start in the same hole?
It is better to start each one a tiny distance out from the center. Many threads through one hole can enlarge it, and the small gap left in the middle is covered by a French knot.