Spring Flower Embroidery: An Easy Hoop to Stitch in a Weekend
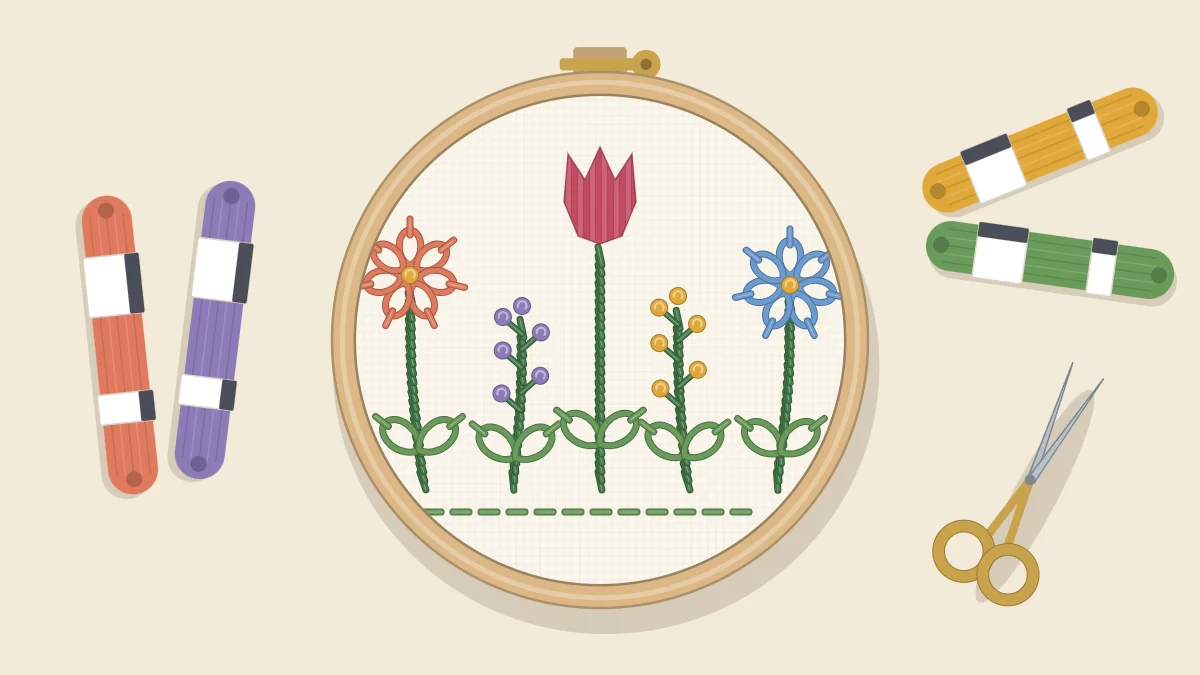
A row of five simple flowers, two daisies, a tulip and two knot-flowered sprigs, worked in four beginner stitches in a 6-inch hoop. Includes a color palette and a clear order of work.
Tutorial at a glance
Materials
- 6 in (15 cm) embroidery hoop
- Medium-weight cotton or linen-blend fabric, about 9 in (23 cm) square
- Six-strand cotton floss in green, pink, yellow, coral and lavender
- Embroidery needle
- Small sharp scissors
- Pencil or erasable fabric pen
- Ruler
Five flowers standing in a row, each on its own green stem: two daisies, one tulip and two sprigs dotted with knots. The whole design uses four stitches, and because every flower is separate, it breaks naturally into short sessions. Stems one evening, leaves the next morning, flowers in the afternoon. For most beginners it adds up to about three to five hours of stitching.
What You Need
- A 6-inch (15 cm) hoop
- Medium-weight woven cotton or linen-blend fabric, about 9 inches (23 cm) square
- Six-strand cotton floss in five colors (see the palette below)
- An embroidery needle and small sharp scissors
- A pencil or erasable fabric pen, and a ruler
A Simple Spring Palette
Five colors are enough. Soft, slightly muted shades tend to sit together more easily than very bright ones, and one green for all the stems and leaves ties the row together.
| Part of the Design | Suggested Color | Strands |
|---|---|---|
| Stems and leaves | Mid green | 2 or 3 |
| Daisy petals | Soft pink, or white on colored fabric | 2 |
| Daisy centers | Warm yellow | 2 |
| Tulip head | Coral or red | 2 |
| Sprig buds | Lavender | 2 |
White petals disappear on white or cream fabric. If you want white daisies, stitch on a pale blue, sage or natural linen-colored background.
Mark the Design
The layout is simple enough to draw straight onto the fabric.
- Put the fabric in the hoop and lightly draw a horizontal baseline about 1 inch (2.5 cm) above the bottom of the hoop. The stems will stand on it; it does not get stitched.
- Mark five points along the baseline, spaced about three quarters of an inch (2 cm) apart, with the middle one at the center of the hoop.
- Draw a stem up from each point. Vary the heights between about 1.5 and 2.5 inches (4 to 6 cm) and give each a slight curve so the row does not look stiff.
- At the top of each stem, sketch the flower: a small circle with a center dot for each daisy, a cup shape for the tulip, and a few dots along the upper part of the stem for each sprig.
- Add one or two short dashes on each stem where the leaves will go.
Arrange the five flowers in any order you like. Placing the tulip in the middle with a daisy and a sprig on each side gives a balanced row. If you would rather trace a drawing made on paper, any of the methods in how to transfer an embroidery pattern will work.
The Four Stitches
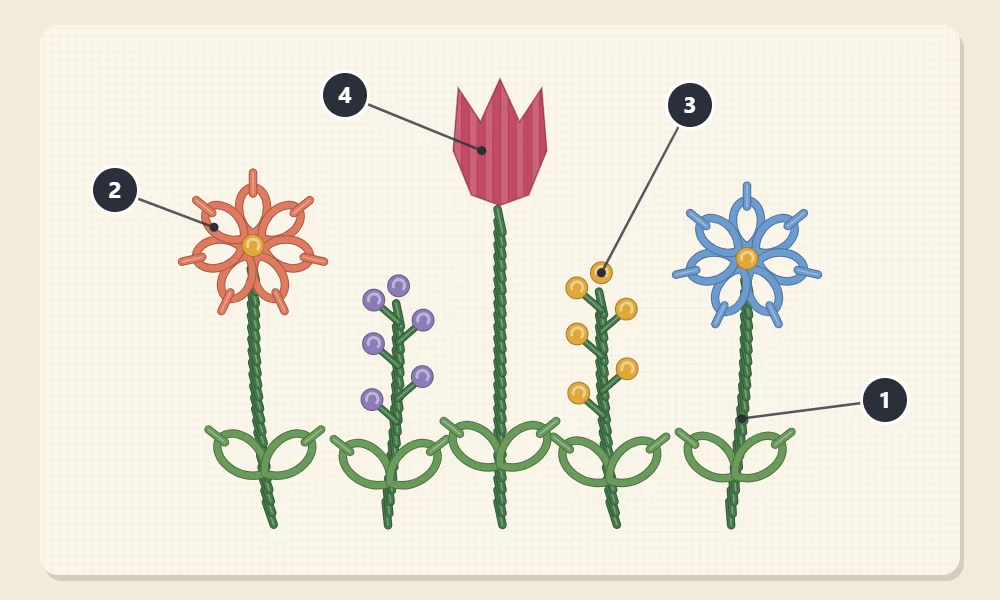
The stitch map numbers each stitch where it is used. Each one has its own tutorial if you need a refresher.
- 1. Stem stitch for the stems. Stem stitch makes a slightly raised, rope-like line that follows a curve well.
- 2. Lazy daisy for the petals and leaves. Each lazy daisy stitch is a single loop held down by a tiny stitch at its tip.
- 3. French knots for the daisy centers and the buds on the sprigs. See French knots for the wrapping method.
- 4. Satin stitch for the tulip head. Satin stitch fills a shape with straight stitches laid side by side.
Order of Work
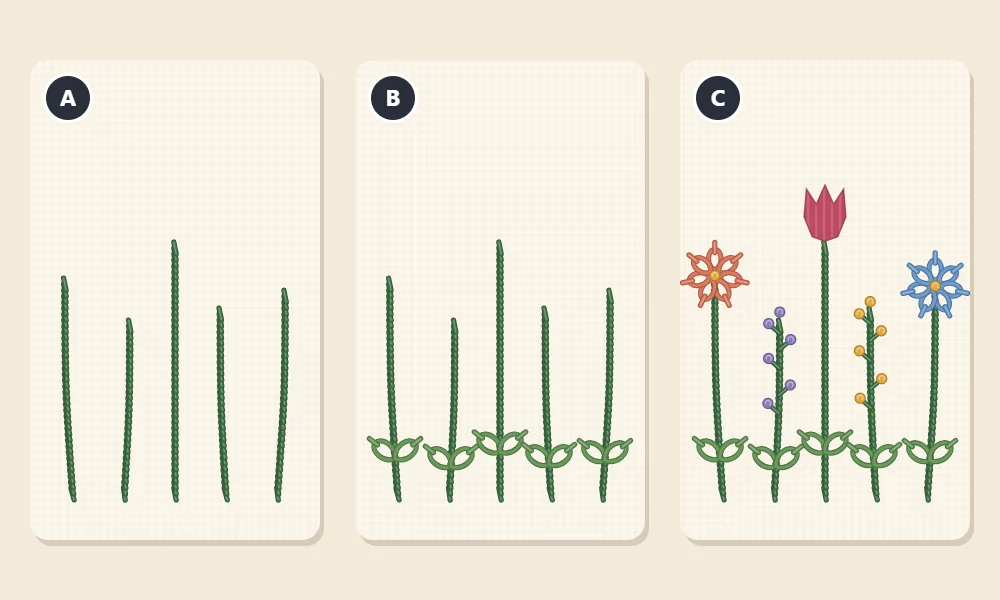
Stitching from the bottom layer up keeps the design clean: stems first, then leaves, then flowers. The three panels of the second picture, A, B and C, show each stage.
Stage A: Stems
- Thread the needle with two strands of green. Three strands give a bolder stem if you prefer.
- Starting at the baseline, work stem stitch up the first stem to the base of its flower. Keep the working thread on the same side of the line for every stitch so the twist stays even.
- Use stitches about an eighth to a quarter of an inch (3 to 6 mm) long, shortening them a little around curves.
- End the thread at the top of each stem and start again at the next baseline point, rather than carrying green across the back between stems.
Stage B: Leaves
- With the same green, work one lazy daisy stitch at each leaf mark. Bring the needle up right beside the stem, take it back down in the same hole leaving a loop, come up at the leaf tip inside the loop, and anchor the loop with a small stitch just outside it.
- Angle the leaves upward and outward. One or two per stem is plenty.
- For the tulip, make the leaves longer than the others so they suit the larger flower. Leave the loops relaxed, since a tight loop turns into a thin line.
Stage C: Flowers
- Daisies: work five to eight lazy daisy petals around each center dot, all starting close to the center and pointing outward. Stitching opposite petals first helps keep the spacing even. Then fill each center with one to three yellow French knots.
- Tulip: outline the cup shape with small backstitches or split stitches, then cover it with satin stitch (number 4 on the map). Begin with one stitch across the widest part, bring the needle up and down just outside the outline, and lay each new stitch snugly beside the last, working out to one side and then the other.
- Sprigs: scatter French knots in lavender along the upper part of each sprig stem, some touching the stem and some just beside it. Six to ten knots per sprig is a good starting point, with more toward the top.
Tip
Save the French knots for last. They stand up from the fabric, and a working thread catches on them easily while you stitch other parts.
Adapting the Design for a Card or Tote
A row of separate flowers scales and trims easily, which makes it a handy motif outside the hoop.
- Greeting card: stitch a shorter row of three flowers at about two thirds of the size, using two strands for stems and one or two for the flowers. Press the piece face down on a towel, then mount the fabric behind a card with a window cut in the front.
- Tote bag: canvas is thicker than hoop fabric, so use a slightly larger needle and three strands so the stitches hold their own against the heavier weave. Work near the top or the center of one side, where a hoop fits, and keep one hand inside the bag so you do not stitch the two sides together.
Watch out
A bag gets rubbed and washed. Keep satin stitches short, secure every thread end well, and before laundering check the care labels of the bag and the floss and test for color bleed.
Finishing Touches
When the last knot is in, look at the row from arm’s length. A gap between two flowers can be filled with a few extra French knots in a spare color, or a single lazy daisy leaf at the foot of a stem. Remove any visible marks following the instructions for the pen you used, let the piece dry if it was dampened, and it is ready to display in the hoop it was stitched in.
Frequently asked questions
Which stitches do I need to know for this flower hoop?
Four: stem stitch for the stems, lazy daisy for petals and leaves, French knots for centers and buds, and satin stitch for the tulip head. A few backstitches are used to outline the tulip before filling it.
In what order should I stitch flowers, stems and leaves?
Work from the bottom layer up: stems first, then leaves, then the flowers. French knots are best left until last because the working thread can catch on them.
Can I use different colors from the suggested palette?
Yes. Keep one green for all stems and leaves and choose three or four flower colors with enough contrast against your fabric; white petals, for example, need a colored background.
How long does this project take a beginner?
As a rough estimate, about three to five hours of stitching, which is easy to split into three short sessions for stems, leaves and flowers.