Embroidered Christmas Ornaments: Easy Mini Hoop Designs
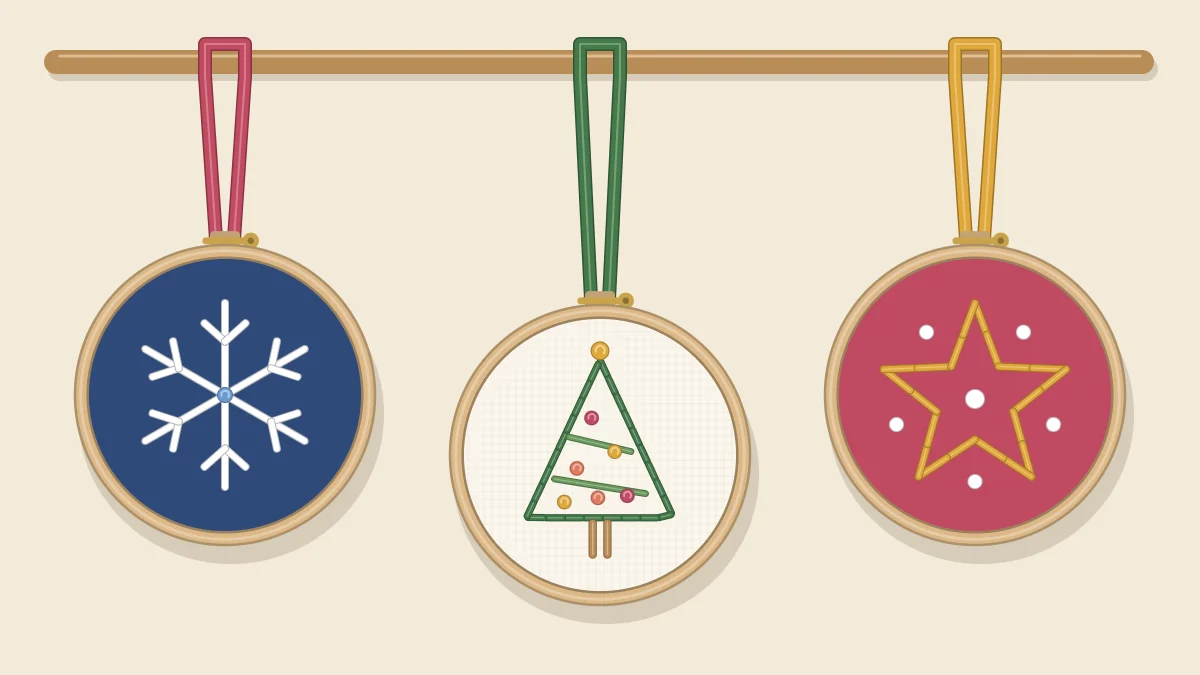
Three small motifs for 3-inch mini hoops, a snowflake, a tree and a star, stitched with straight stitch, backstitch and French knots, then finished with a felt back and a ribbon loop.
Tutorial at a glance
Materials
- 3 wooden mini hoops, about 3 in (7.5 cm)
- Medium-weight cotton or linen-blend fabric, about 5 in (13 cm) square per hoop
- Six-strand cotton floss in white, green, red and yellow
- Embroidery needle
- Small sharp scissors
- Pencil or erasable fabric pen
- Felt for backing
- Strong sewing thread
- Narrow ribbon, about 8 in (20 cm) per ornament
A 3-inch (7.5 cm) mini hoop holds a circle of fabric barely wider than a cookie, which makes it just the right size for a tree ornament: one small motif, a handful of stitches and a ribbon to hang it by. The three designs here, a snowflake, a tree and a star, use only straight stitch, backstitch and French knots, so they suit a first or second project. Allow roughly one to two hours per ornament, including finishing the back.
What You Need
- Three wooden mini hoops, about 3 inches (7.5 cm) across
- Medium-weight woven cotton or linen-blend fabric, one square of about 5 inches (13 cm) per hoop
- Six-strand cotton floss in white, green, red and yellow or gold
- An embroidery needle and small sharp scissors
- A pencil or erasable fabric pen
- Felt for backing, strong sewing thread, and about 8 inches (20 cm) of narrow ribbon per ornament
Use two strands of floss throughout unless a step says otherwise. Fabric color does a lot of the work at this size: white floss needs a colored background such as red, green or dark blue to show up, while green and red stand out well on cream or natural linen.
If you do not have mini hoops yet, the guide to choosing an embroidery hoop covers sizes. A mini hoop is small to hold, so some stitchers work the motif in a larger hoop and move the fabric to the mini hoop for finishing.
Mark the Motifs
Each design fits inside a circle about 2 inches (5 cm) across, which leaves a clear border inside the hoop. You can draw them freehand with a ruler:
- Snowflake: mark a center dot, then draw three straight lines of equal length crossing at that dot, like a six-pointed asterisk.
- Tree: draw a tall triangle with a short vertical line under the base for the trunk.
- Star: draw a five-pointed star in one continuous line, or trace around a small star shape.
Draw lightly, since marks on an ornament will not be washed out later. For other ways to get a design onto fabric, including dark fabric where pencil does not show, see how to transfer an embroidery pattern.
Motif 1: Straight Stitch Snowflake
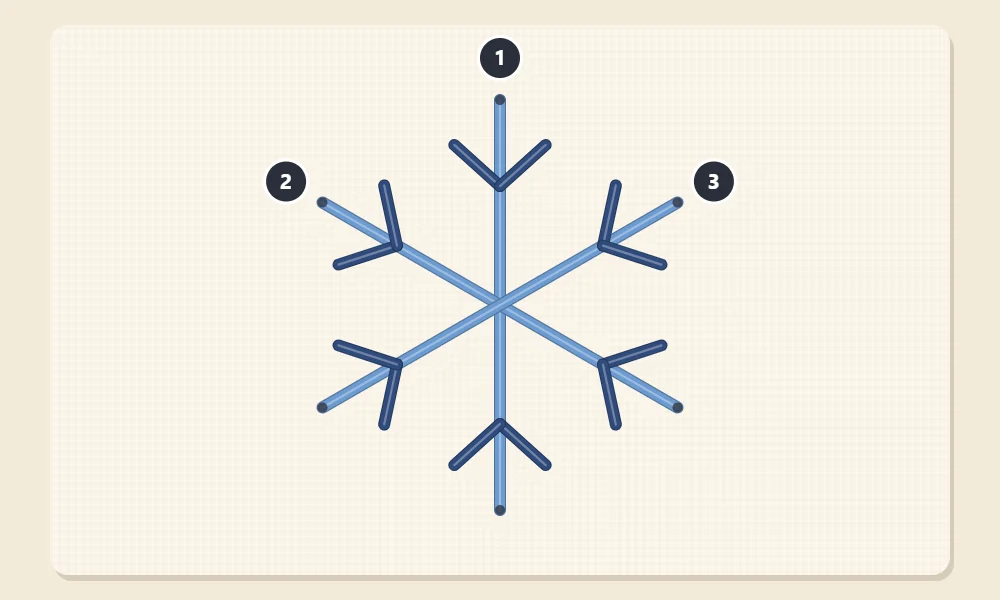
A straight stitch is the simplest stitch there is: the needle comes up at one end of a line and goes down at the other. The snowflake is built from nothing else. Follow the numbers in the diagram.
- Thread the needle with two strands of white floss and secure the thread on the back.
- Stitch line 1: bring the needle up at one end of the first drawn line and take it down at the opposite end, so a single long stitch lies across the center.
- Stitch line 2 the same way, crossing line 1 at the center dot.
- Stitch line 3, crossing the other two at the same point. You now have six arms of equal length.
- Add the small V shapes. Near the end of one arm, bring the needle up a short distance to one side of the arm and take it down on the arm itself. Repeat from the other side so the two short stitches meet on the arm and form a V.
- Work a V on each of the remaining five arms, keeping them the same distance from the center.
- Optional: make a tiny stitch over the point where the three lines cross to hold them flat, or cover the crossing with a single French knot.
Tip
Long straight stitches go slack easily. Keep the fabric drum-tight and pull each one just until it lies flat. If the long lines still sag, work each arm as its own stitch from the tip into the center instead.
Motif 2: Backstitch Tree
- With two strands of green, outline the triangle in backstitch, using stitches about an eighth of an inch (3 mm) long. End a stitch exactly at each corner so the points stay sharp.
- For a fuller tree, add two or three horizontal rows of backstitch across the inside of the triangle, like garlands.
- Stitch the trunk with two or three short straight stitches side by side in brown or dark green.
- Scatter five to seven French knots in red inside the outline as baubles. Two wraps around the needle with two strands gives a knot that suits this scale.
- Finish with one yellow French knot, or a tiny cross of two straight stitches, at the top point.
Motif 3: Backstitch Star
- With two strands of yellow or gold, backstitch along the star outline. Keep the stitches short and even.
- At each of the five outer points and five inner corners, finish a stitch right on the corner before changing direction. That is what keeps a small star crisp.
- Add a second line of backstitch just inside the first if you want a bolder star.
- Dot six to eight French knots around the star in white or a contrasting color, spacing them unevenly so they read as sparkle rather than a ring.
The three motifs compare like this:
| Motif | Stitches Used | Suggested Floss Color | Fabric That Shows It Well |
|---|---|---|---|
| Snowflake | Straight stitch | White | Red, green or dark blue |
| Tree | Backstitch, straight stitch, French knots | Green with red knots | Cream or natural |
| Star | Backstitch, French knots | Yellow or gold | Dark blue, red or cream |
Finish the Back and Add a Ribbon Loop
An ornament turns on its ribbon, so the back will be seen. A felt backing keeps it tidy.
- Center the motif in the mini hoop with the screw at the top, and tighten the screw firmly.
- Trim the fabric to a circle, leaving a margin of roughly half an inch to three quarters of an inch (1.5 to 2 cm) beyond the hoop. A small hoop needs less margin than a large one.
- Work a line of running stitch around the margin with strong thread, pull it up so the fabric gathers toward the center of the back, and knot it.
- Cut a felt circle that just covers the gathers and sew it on with small stitches around its edge. This is the felt backing numbered 1 in the picture.
- Thread the ribbon through the gap under the screw and tie the ends together to make the loop numbered 2.
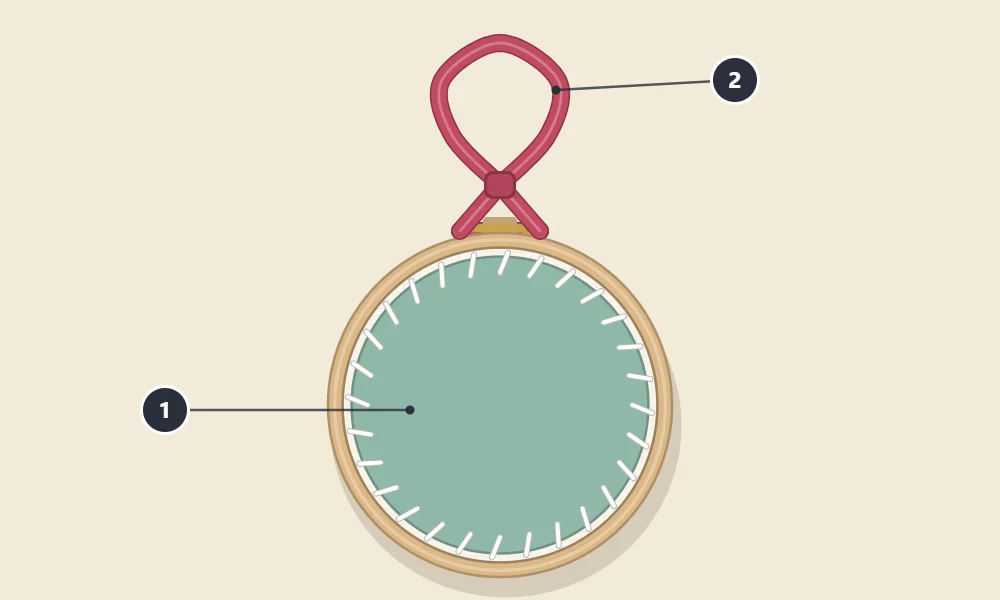
The same method, with more detail on each step, is covered in how to finish the back of an embroidery hoop.
Variations and Care
- Stitch a year or an initial in backstitch below the motif to make a keepsake.
- Swap the color scheme: a red snowflake on white, or a white tree on green.
- Make a set of three matching ornaments in one fabric as a gift.
Store finished ornaments flat in a box, with tissue between them so the French knots are not crushed. If one gets dusty, a soft dry brush is gentler than washing.
Watch out
Mini hoops, needles and scissors are small enough to be a hazard for young children and pets. Hang the ornaments on higher branches and supervise children who are stitching.
Frequently asked questions
What size hoop is best for embroidered ornaments?
A mini hoop of about 3 inches (7.5 cm) is a common choice: large enough for a simple motif and light enough to hang on a branch. Slightly larger hoops also work on sturdier branches.
Which fabric color should I use for a white snowflake?
White floss needs contrast, so choose a colored fabric such as red, green or dark blue. On cream or white fabric, stitch the snowflake in a color instead.
How do I hang a mini hoop ornament?
Thread a narrow ribbon through the gap under the screw at the top of the hoop and tie the ends together to form a loop.
Can a complete beginner make these ornaments?
Yes. The designs use only straight stitch, backstitch and French knots, and each motif is small. Practicing a few French knots on scrap fabric first makes the tree and star go more smoothly.