How to Start and End Embroidery Thread Securely
Three ways to anchor a new thread (simple knot, waste knot, anchoring stitches) and the knot-free way to finish it by weaving the tail under stitches on the back.
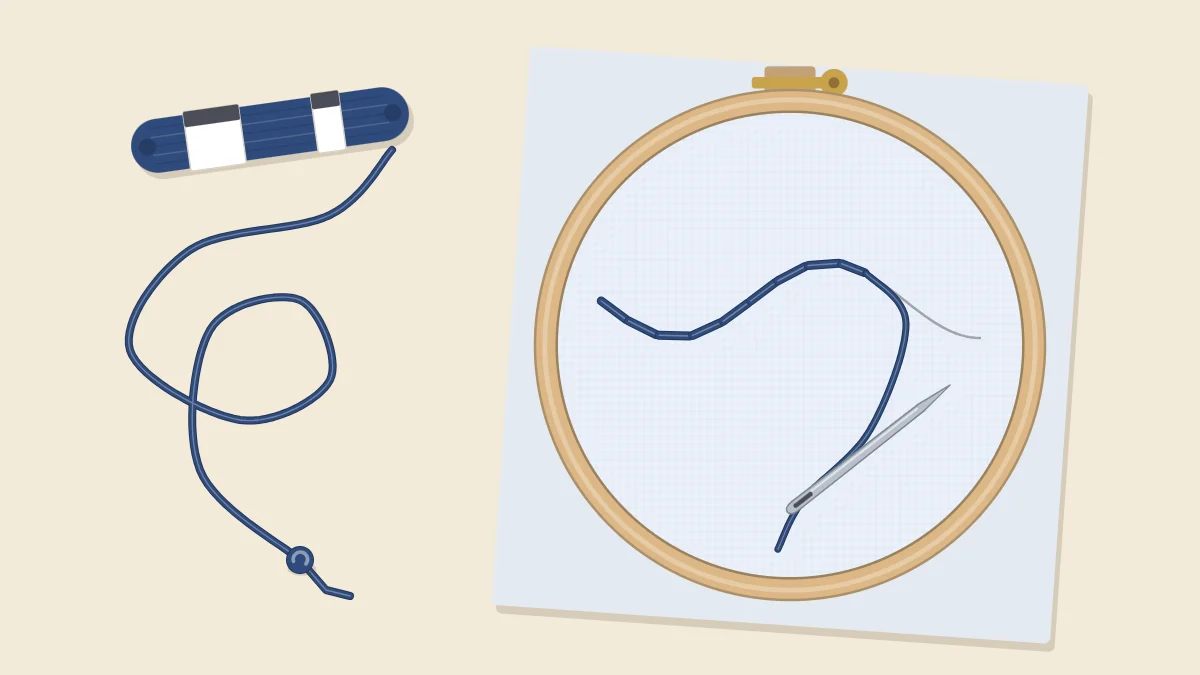
Every length of thread has to be fastened twice: once before the first stitch and once after the last. Get either one wrong and stitches work loose, sometimes weeks later, sometimes in the first wash. The good news is that there are only a handful of standard methods, and choosing between them comes down to one question: will anyone see or feel the back of this piece, and will it be washed?
Three Ways to Start a Thread
| Method | Best For | Drawback |
|---|---|---|
| Simple knot | Practice pieces, hoops for display | Leaves a small lump that can show or wear loose |
| Waste knot | Line stitches where a flat back matters | Takes a little planning |
| Anchoring stitches | Filled shapes and areas that will be covered | Needs stitching on top to hide it |
The Simple Knot
Tie a small knot at the end of the long working thread, the end that is not hanging beside the needle as a tail. Bring the needle up from the back of the fabric at your starting point and pull until the knot stops against the back.
An ordinary overhand knot is enough: make a loop near the end, pass the end through it and tighten. If the knot slips through the weave, tie a second one on top of the first to make it bigger. Trim the end beyond the knot to about a quarter inch (6 mm) so it does not get caught in later stitches.
The Waste Knot
A waste knot holds the thread only temporarily. Your first stitches trap the thread on the back, and then the knot is cut away, leaving nothing but a flat, secured tail.
- Tie a knot at the end of the working thread.
- Take the needle down from the front of the fabric, on your design line, about 1 to 2 inches (3 to 5 cm) along from where the stitching will begin. The knot stays on the surface, shown as 1 in the diagram.
- Bring the needle up at the starting point of the line. The thread now runs along the back of the fabric, directly under the line, shown as the dotted line.
- Stitch along the line toward the knot, shown as 2. Each stitch crosses over the thread on the back and pins it down.
- After a few stitches, turn the hoop over and check that the stitches really are catching the thread. Nudge the thread under the line with your needle if it has drifted.
- When the stitching reaches the knot, lift the knot slightly and snip it off close to the fabric, taking care not to cut the cloth.
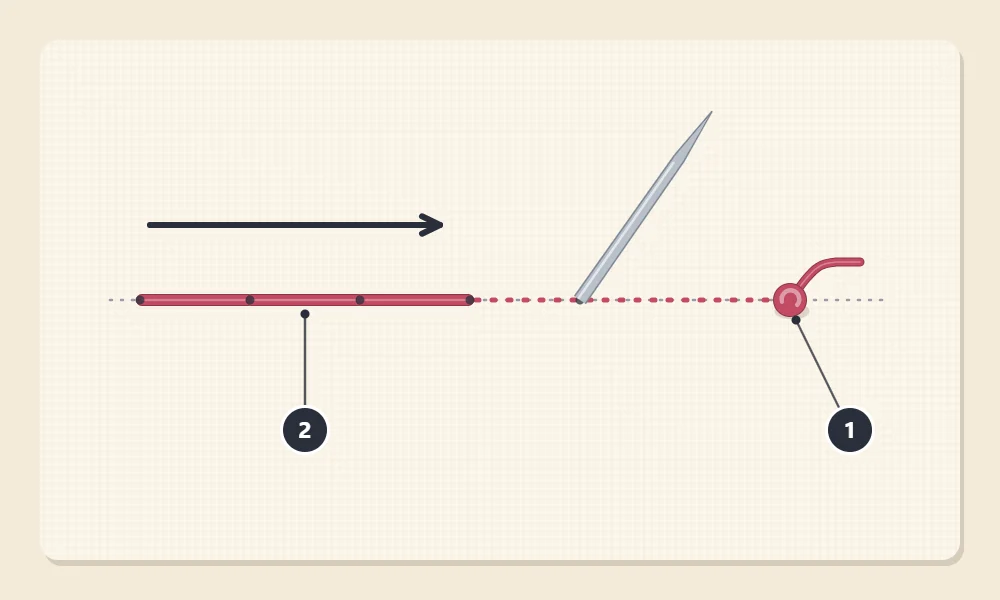
The waste knot suits line stitches such as backstitch, where the back of each stitch lies along the line and holds the tail down.
Anchoring Stitches
Where an area is going to be covered with stitching, you can start with no knot at all. Bring the needle up inside the shape, leaving a short tail on the back, and work two or three tiny stitches on the spot, each only a thread or two of fabric long. Tug gently to check that they hold, then begin the real stitching and work over them.
This is the usual start for fillings such as satin stitch, because the anchoring stitches vanish under the fill. It does not work for an open line with bare fabric on both sides, since there is nothing to cover them.
Tip
Once a piece has some stitching on it, new threads are easy to start. On the back, slide the needle under a few existing stitches near your starting point, then bring it up to the front and carry on.
How to End a Thread by Weaving It In
The standard finish uses no knot. The thread is woven under the backs of stitches you have already made, and friction holds it in place.
- Stop while you still have about 3 to 4 inches (8 to 10 cm) of thread. Ending with less makes the needle hard to handle.
- Take the needle through to the back to complete your last stitch, then turn the hoop over.
- Slide the needle under the backs of about four nearby stitches, as the diagram shows, moving in the direction of the arrow. Pass under the threads only, without piercing the fabric, so nothing shows on the front.
- Pull the thread through until it lies snug but does not pucker the stitches.
- For extra hold, turn back and pass the needle under two or three of the same stitches in the opposite direction.
- Trim the thread close to the stitches.
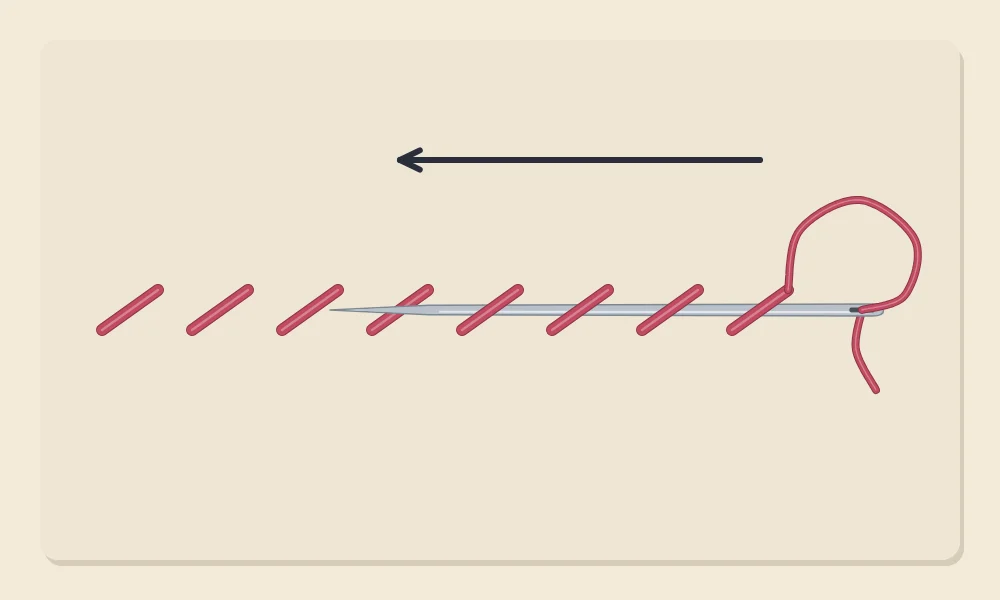
Weave into stitches of the same or a similar color where you can. A dark tail woven behind pale stitches on thin fabric may show through as a faint shadow on the front.
When Knots Are Fine and When They Show
Knots are not forbidden. For a practice sampler or a piece that will stay in its hoop on a wall, a small knot on the back does no harm, especially once the back is covered. The guide to finishing the back of a hoop shows how to hide it completely.
Knots become a problem in a few specific situations:
- Thin or pale fabric. A knot can show through as a dot or a small bump on the front.
- Pieces that will be pressed or framed flat. Pressing over a knot can leave a raised mark on the right side.
- Items that are used and washed. On towels, clothing and napkins, knots can rub, work loose or pull through the weave. Woven-in ends hold better and feel smoother, which is why the embroidered tea towel project avoids bulky knots.
- Loosely woven fabric. A small knot can pop straight through to the front when you pull the first stitch.
Small Habits That Keep the Back Tidy
- End and restart instead of jumping. If the next area to stitch is more than about half an inch (1 cm) away, finish the thread and start again there. A long thread carried across the back can snag, and a dark one may show through.
- Trim as you go. Loose tails left hanging on the back get caught in later stitches and are dragged through to the front.
- Do not stitch down to the last inch. Running out of thread mid-stitch leaves too little to weave in. If that does happen, slip the needle under the stitches first, then thread the short end through the eye and pull it under.
Watch out
When trimming a waste knot or a woven tail, keep the scissor tips flat against the surface and pointing away from the stitches. Cutting close is good; cutting the fabric or the stitching is not repairable.
If threading and tail length are still giving you trouble before you even reach the first stitch, how to thread an embroidery needle covers both.
Frequently asked questions
Is it wrong to use knots in embroidery?
No. Knots are fine for practice pieces and for hoops that will hang on a wall. They are best avoided on thin fabric and on items that will be washed or pressed flat, where they can show or work loose.
How much thread should I leave for finishing off?
Stop stitching when about 3 to 4 inches (8 to 10 cm) remain. That leaves enough length to turn the work over and weave the needle under several stitches comfortably.
How many stitches should I weave the tail under?
About four is a good starting point. For items that will be handled or washed, weave back under two or three of them in the opposite direction for extra hold.
My knot keeps pulling through the fabric. What can I do?
Tie a second knot on top of the first to make it larger, or switch to a waste knot or anchoring stitches. On loosely woven fabric, knot-free starts are usually more reliable.