Embroidered Tea Towel: A Useful First Project
Embroider a small motif on a tea towel that can stand up to real use: prewash the towel, place the design near the hem, choose short sturdy stitches and secure every thread end without knots.
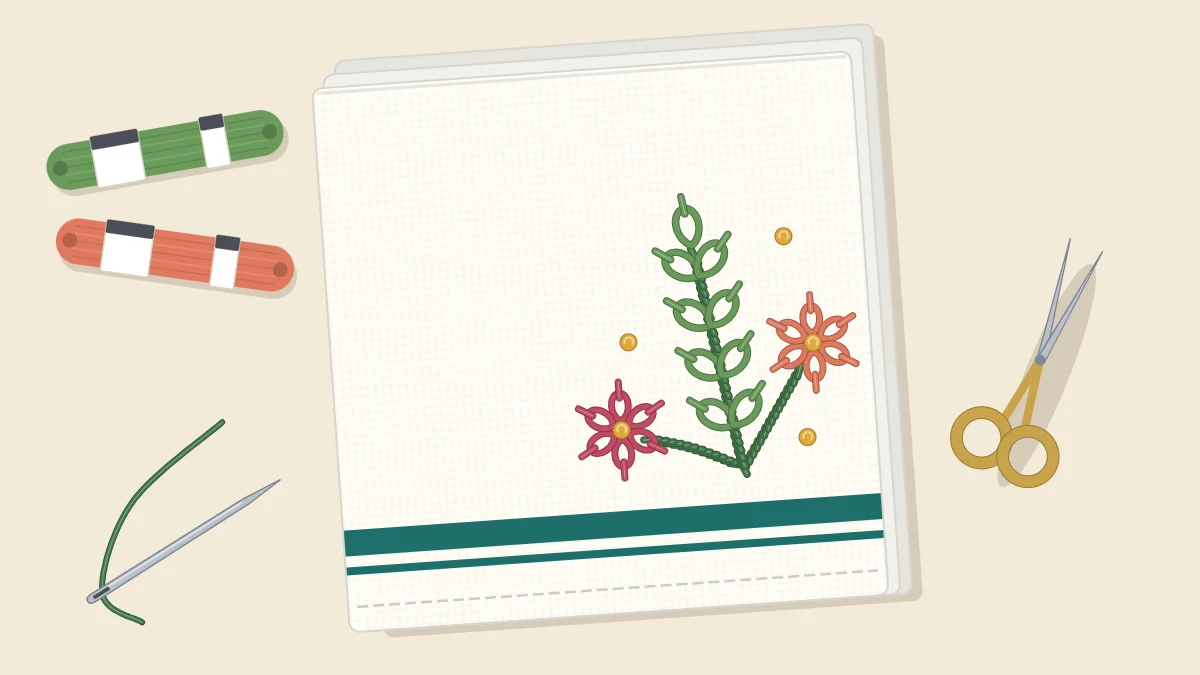
Tutorial at a glance
Materials
- Plain woven cotton or linen tea towel, prewashed
- Six-strand cotton floss in two or three colors
- Embroidery needle
- Small sharp scissors
- 5- or 6-inch (13 or 15 cm) embroidery hoop
- Water-soluble fabric pen or pencil
- Ruler and pins
- Small motif about 3-4 inches (7.5-10 cm) wide
A hoop on the wall never meets a washing machine. A tea towel does, again and again, along with hot water, wet hands and the edge of a counter. That is what makes a towel such a good second or third project: it teaches you to stitch for real use. The design itself can be very small. What matters is preparing the towel, choosing stitches that lie close to the fabric, and securing every thread end without lumps.
What You Need
- A plain woven cotton or linen tea towel in a light color. Smooth, flat weaves such as the flour sack type are easiest; terry cloth and deep waffle textures swallow stitches.
- Six-strand cotton floss in two or three colors
- An embroidery needle and small sharp scissors
- A 5- or 6-inch (13 or 15 cm) hoop
- A water-soluble fabric pen or a pencil, a ruler and a few pins
- A small motif about 3 to 4 inches (7.5 to 10 cm) wide: a leafy sprig, a few flowers, a simple fruit or a short word
Prewash the Towel First
Cotton and linen often shrink the first time they are washed. If the towel shrinks after you have stitched it, the fabric tightens around the thread and the design puckers. Wash and dry the new towel the way you expect to launder it in use, following its care label, then iron it flat. Prewashing also removes the finish many new towels carry, which makes the cloth softer and easier to stitch.
Floss needs a moment of attention too. Before using a strong color, especially a red or a dark blue, on a pale towel, test it for color bleed: wet a short length, lay it on a scrap of white cloth or paper towel, and let it dry. If color transfers, choose a different thread for this project.
Where to Place the Motif
A tea towel is usually seen folded in thirds lengthwise and hung over an oven handle or a rail, so the visible part is the middle third of one short end. That is where the motif goes.
- Lay the ironed towel flat, right side up, with one short hem toward you. This is the bottom hem, marked 1 in the diagram.
- Fold the towel in half lengthwise and finger-press a crease a few inches up from the hem, then open it. Mark the crease with a light dashed line; this is the center line.
- Measure up from the bottom hem and make a mark about 3 inches (7.5 cm) above it. This will be the lower edge of the motif. Stitching closer to the hem makes it hard to fit the hoop.
- Draw a light dashed rectangle the size of your motif, centered on the center line and sitting on that mark. This is the motif area, marked 2.
- Transfer the design inside the rectangle. On a thin, pale towel you can usually slip the printed pattern underneath and trace it directly; other options are covered in how to transfer an embroidery pattern.
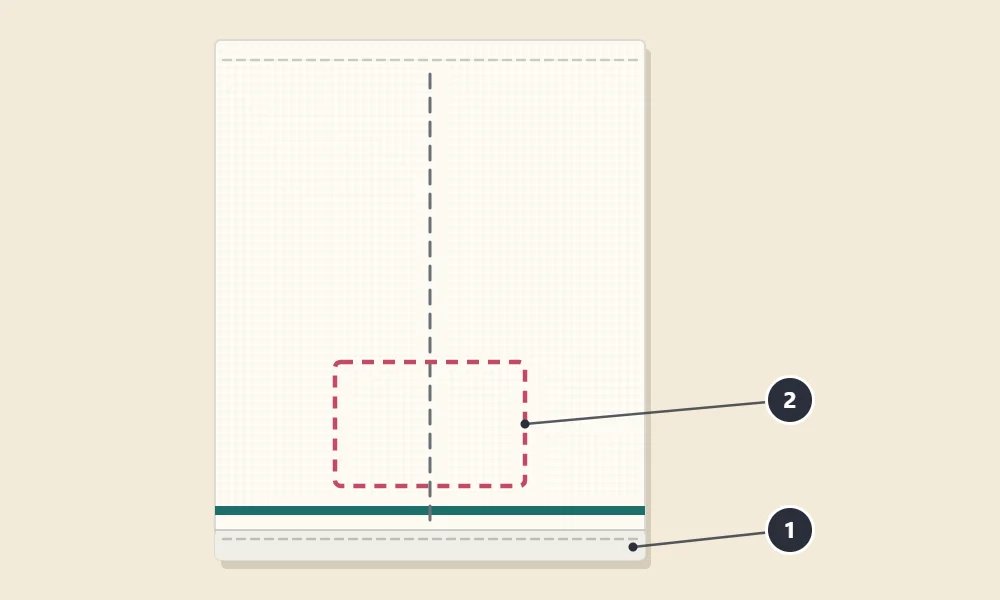
A lower corner is a common alternative. Use the same method, measuring the same distance in from the side hem as up from the bottom hem.
Stitches That Survive Washing
In the wash, anything that stands away from the fabric can catch, and anything long can loosen. Choose stitches that are short and anchored at close intervals.
| Stitch | On a Towel | Notes |
|---|---|---|
| Backstitch | Very good | Short stitches, each one locked by the next |
| Stem stitch | Very good | Firm, rope-like line for stems and lettering |
| Chain stitch | Good | Keep the links small and snug |
| Lazy daisy | Good if small | Loops under about 3/8 inch (1 cm), anchored firmly |
| French knots | Good | Seat each knot firmly against the fabric |
| Satin stitch | Only when short | Stitches longer than about 1/4 inch (6 mm) tend to snag and shift |
If the design has a shape you want filled, divide it into narrow sections so no single satin stitch is long, or fill it with rows of backstitch or chain stitch worked side by side. Use two or three strands of floss. More strands sit higher on the surface and wear faster.
Stitching the Motif
- Mount the motif area in the hoop. Towel fabric is often loosely woven, so tighten gently and avoid stretching the weave out of square.
- Cut a length of floss about as long as your forearm.
- Start without a knot. Leave a tail of about 2 inches (5 cm) on the back, hold it against the fabric along your stitching line, and work the first four or five stitches over it so they trap it. The methods are shown in how to start and end embroidery thread.
- Stitch the lines first (stems, outlines, lettering), then leaves and petals, then knots.
- Pull each stitch until it rests on the fabric and no further. A towel is soft and puckers easily under tight stitches.
- To finish a thread, turn to the back and slide the needle under four or five stitches, then back under two of them in the other direction. Trim the tail close.
- When moving to a part of the design more than about 1/2 inch (1.3 cm) away, end the thread and start again instead of carrying it across.
- Take the towel out of the hoop whenever you stop for the day so the ring does not leave a lasting crease.
Why the Back Matters on a Towel
Unlike hoop art, a towel has no hidden side. The back is seen every time the towel is unfolded, and it takes as much wear as the front.
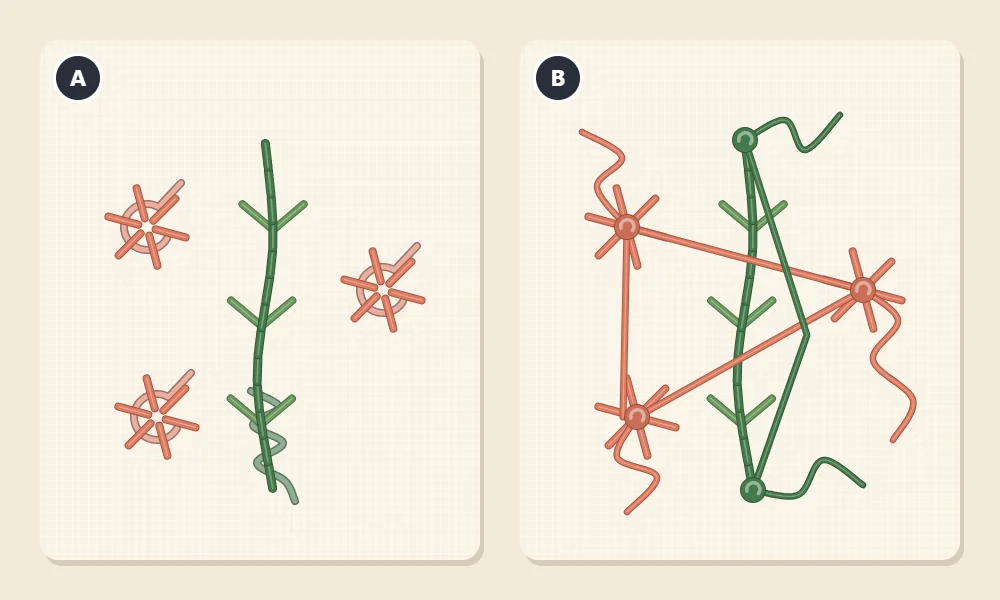
Knots, as on back B, form hard lumps that rub against the fabric and can work loose in the wash. Long threads that jump between areas catch on fingers and cutlery, and when one is pulled it tightens the stitches on the front. They can also show through thin toweling as a shadow. Woven tails, as on back A, lie flat and are held by friction along their whole length.
Tip
On a towel, weave tails a little farther than you would on a display piece, and trim them close to the stitches so no loose end is left to catch.
Removing Marks and Pressing
Remove pattern marks before any heat touches the towel, following the instructions for your marking tool; heat can set some inks. For water-soluble pens this usually means rinsing in cool water. Then lay the damp towel face down on a folded bath towel and press from the back, so the padding protects the raised stitches. Irons are hot enough to burn, so keep them away from children and never leave one face down.
Laundering an Embroidered Towel
Care instructions vary between fabrics and threads, so check the care label of the towel and the information that came with the floss before the first wash. As general guidance:
- Wash in cool or lukewarm water with a mild detergent, on a gentle cycle or by hand.
- For the first wash, launder the towel on its own or with similar colors in case any dye runs.
- Do not wring the embroidered section. Reshape the towel and dry it flat or on a line; high dryer heat is harder on both thread and fabric.
- Iron from the back while slightly damp.
More detail is in the guide to washing and ironing hand embroidery. A little softening and fading over time is normal for a towel that is used.
Frequently asked questions
Do I need to prewash a tea towel before embroidering it?
It is strongly recommended. Cotton and linen often shrink in the first wash, and if that happens after stitching, the fabric can pucker around the design.
Which stitches hold up best on a towel that gets washed?
Short, closely anchored stitches such as backstitch, stem stitch and small chain stitches hold up well. Long satin stitches and large loose loops are more likely to snag or shift.
Can I use knots on the back of a tea towel?
Knots can work loose in the wash and leave hard lumps on a towel that is seen from both sides. Trapping the starting tail under the first stitches and weaving the finishing tail under several stitches is neater and more secure.
Do I need stabilizer to embroider a tea towel?
Usually not for a small hand-stitched motif on a woven towel held taut in a hoop. If the weave is very loose, shorter stitches and gentle tension matter more than extra layers.