Your First Embroidery Sampler: A Simple Practice Hoop
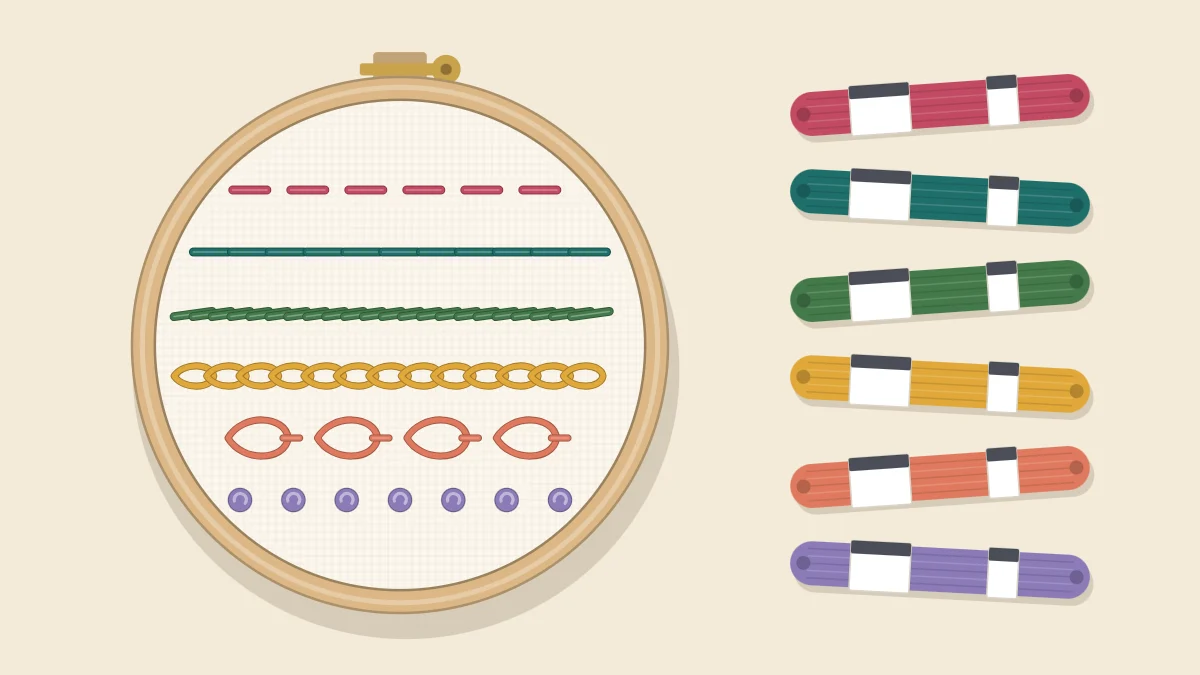
Mark six lines in a 6-inch hoop and stitch one basic stitch per row. This beginner sampler practices running stitch, backstitch, stem stitch, chain stitch, lazy daisy and French knots in one piece.
Tutorial at a glance
Materials
- 6-inch (15 cm) embroidery hoop
- 9-inch (23 cm) square of light medium-weight cotton or linen
- Six-strand cotton floss in six colors
- Embroidery needle
- Small sharp scissors
- Ruler
- Pencil or water-soluble fabric pen
Six pencil lines across a 6-inch (15 cm) hoop are enough to turn loose practice into a finished piece. A sampler gives each stitch its own row, so you can see your progress from the first wobbly stitch to the last even one, and you end up with a reference you can keep beside you for later projects. This one uses six stitches that cover most beginner patterns: three line stitches, a looped line, a petal and a knot.
What You Need
- A 6-inch (15 cm) embroidery hoop
- A square of light-colored, medium-weight cotton or linen, about 9 inches (23 cm) on each side
- Six-strand cotton floss in six colors
- An embroidery needle with an eye large enough for three strands
- Small sharp scissors
- A ruler and a sharp pencil or a water-soluble fabric pen
Needles and scissors are sharp, so keep them out of reach of small children and put them away when you stop.
Choosing Six Colors
One color per row makes it easy to tell the stitches apart later. Pick colors that show clearly against the fabric; very pale yellow or cream on white cloth hides the stitches you are trying to study. A simple approach is to choose three shades of one color family and three of another, for example three blues and three corals, and alternate them down the hoop. Use three strands of floss for rows 1 to 4 and two strands for rows 5 and 6, where thinner thread makes loops and knots easier to control. Pull the strands out of the cut length one at a time, then lay the number you need back together.
Marking the Guide Lines
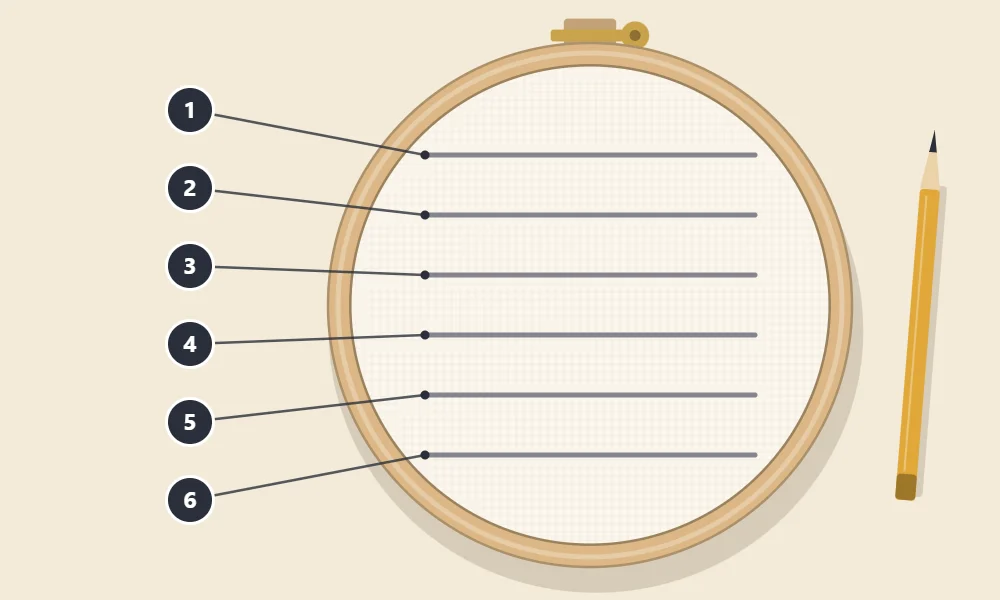
- Press the fabric flat. Lay the inner ring of the hoop in the middle of the square and trace lightly around the inside of it, so you can see the working area.
- Find the center of that circle and draw a light horizontal line through it with the ruler. This is only a helper line.
- Measure about 3/8 inch (1 cm) above and below the helper line and draw lines 3 and 4 there.
- Add two more lines above and two more below, each about 3/4 inch (2 cm) from the last. You now have six parallel lines 3/4 inch (2 cm) apart.
- Stop every line about 1/2 inch (1.3 cm) short of the traced circle. Stitching right up to the ring is awkward, and the top and bottom rows will naturally be shorter than the middle ones.
- Write the numbers 1 to 6 very lightly down the left side, or just count from the top.
- Mount the fabric in the hoop with the lines running straight across and tighten it until it feels like a drum. The steps for putting fabric in a hoop explain how to tighten without pulling the lines into curves.
Tip
Test your marking tool on a scrap of the same fabric before you draw the lines. Pencil is easy to control but may not wash out completely, so keep it faint.
Stitching the Six Rows
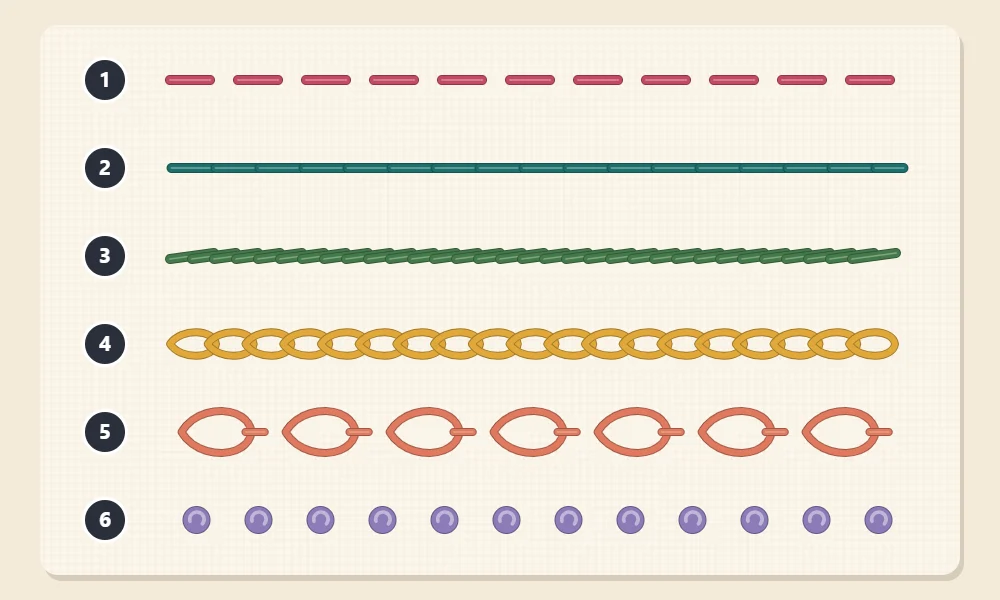
Work from row 1 down to row 6; the stitches are arranged roughly from easiest to fussiest. Cut each thread about forearm length. Start with a small knot on the back for this practice piece, or use one of the neater methods in how to start and end embroidery thread. Right-handed stitchers usually find it easiest to work rows 1, 2 and 4 from right to left and row 3 from left to right; reverse that if you are left-handed, and turn the hoop whenever it helps.
Row 1: Running Stitch
Bring the needle up at one end of line 1, go down about 1/4 inch (6 mm) along, leave a gap of the same length, and come up again. Repeat to the end. The goal is stitches and gaps of equal length.
Row 2: Backstitch
Come up one stitch length in from the end of line 2 and go back down at the very end. Come up one stitch length ahead of where the thread first emerged, then go back down into the end of the previous stitch. The result is a solid line with no gaps. Keep the stitches about 1/8 to 1/4 inch (3 to 6 mm) long.
Row 3: Stem Stitch
Come up at the start of line 3 and go down one stitch length along. Before pulling the thread tight, come up again halfway back along that stitch, with the loop of working thread held below the line. Pull through and repeat, always keeping the thread on the same side. The stitches overlap and twist into a thin rope. If the twist comes and goes, the thread has swapped sides; the stem stitch tutorial shows the movement in detail.
Row 4: Chain Stitch
Come up at the start of line 4. Go back down into the same hole, leaving a loop on the surface, and bring the needle up one stitch length along the line, inside the loop. Pull gently until the loop lies flat without tightening into a straight line. Go down again inside the loop you just made, at the point where the thread emerged, to begin the next link. At the end of the row, hold the last loop in place with a tiny stitch over its tip.
Row 5: Lazy Daisy Stitches
A lazy daisy is a single chain link, anchored on its own. Come up on line 5, go down in the same hole leaving a loop, come up inside the far end of the loop, and take a tiny stitch over the loop to hold it. Space separate loops evenly along the row and leave them slightly rounded; pulled tight, they collapse into thin lines.
Row 6: French Knots
Mark dots about 1/4 inch (6 mm) apart along line 6. For each dot, come up, hold the thread taut with your other hand, wrap it twice around the needle, and go down right beside the place you came up, not into the same hole. Keep holding the thread until the knot settles on the fabric. Expect the first few to misbehave; the full method is in the guide to French knots.
If a Row Goes Wrong
A sampler is for practice, so uneven stitches are part of its purpose. If a row bothers you, unpick it by sliding the eye end of the needle under one stitch at a time and lifting, rather than pulling on a long tail. If there is space, another option is to stitch the same row again directly underneath and compare the two. Fabric that starts to pucker usually means the stitches are being pulled too tight or the hoop has loosened; tighten the hoop and let the thread rest on the surface instead of sinking into it.
What to Do With the Finished Sampler
- Keep it as a reference. Write the stitch names and strand counts on a slip of paper and tuck it behind the hoop.
- Display it. Leave it in the hoop, trim the spare fabric and gather it at the back, as described in how to finish the back of an embroidery hoop.
- Make a second one. Repeat the six rows with different strand counts, or draw the lines as gentle waves to practice curves.
Once all six rows feel comfortable, you have every stitch needed for a simple flower design, a monogram or a wreath.
Frequently asked questions
What is an embroidery sampler?
A sampler is a practice piece where each stitch is worked in its own row or area. It lets you learn stitches without the pressure of a picture and becomes a reference you can check later.
How long should each stitch be on a sampler?
About 1/8 to 1/4 inch (3 to 6 mm) is a comfortable starting range for line stitches. Consistency matters more than the exact length, so pick one size and try to keep to it across the row.
Do I have to use six different colors?
No. One or two colors work just as well for practice. Separate colors simply make it easier to tell the rows apart and to see where one stitch ends and the next begins.
Which stitch should I add after these six?
Satin stitch is the usual next step because it fills shapes rather than drawing lines. Add it as a seventh row of small filled leaves or squares, or practice it on a spare piece of fabric.