French Knots: A Beginner’s Guide That Actually Works
Learn the French knot step by step: how to wrap, how to hold the thread taut with your other hand, and why the needle must go down beside the hole it came up through, not into it.
Tutorial at a glance
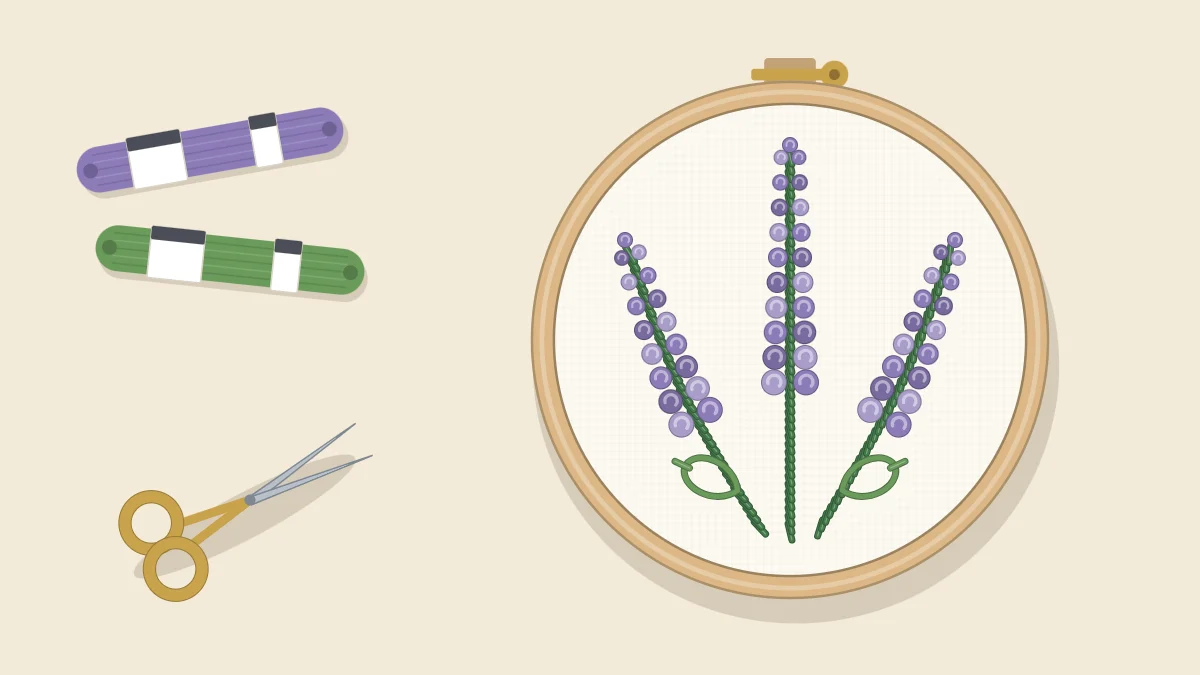
Materials
- Medium-weight cotton or linen fabric
- 6-inch (15 cm) embroidery hoop
- Six-strand cotton floss
- Milliner or embroidery needle
- Small sharp scissors
- Pencil for marking dots
A French knot is nothing more than thread wrapped around a needle and pinned to the fabric, yet it is the stitch beginners most often give up on. The knot disappears through the cloth, or it turns into a loose loop, or the needle jams halfway. Almost every one of those failures comes from two small habits: letting go of the thread too early, and pushing the needle back into the hole it came out of. Fix those two things and the stitch becomes reliable.
What You Need
- Fabric held drum-tight in a hoop. A slack surface makes the wraps hard to control.
- Six-strand cotton floss. Two strands is a good starting point for practice.
- A needle whose eye is not much wider than its shaft. A milliner needle is the usual choice because the wraps slide over it easily; see the guide to embroidery needle types if you are not sure which one you have.
- Both hands free. If your hoop has to be held, rest its edge against a table so one hand can manage the thread.
Cut the floss to about forearm length. A longer thread twists on itself and ties accidental knots before you can make the ones you want. Separate the strands one at a time and put two back together before threading the needle; strands that have been separated and recombined lie flatter in the wraps.
How to Make a French Knot, Step by Step
The instructions below call your stitching hand the needle hand and the other one the thread hand. The thread hand does most of the important work.
- Come up at 1. Bring the needle up through the fabric where you want the knot and pull the thread all the way through.
- Take hold of the thread. With your thread hand, pinch the working thread about 1 to 2 inches (3 to 5 cm) from point 1 and hold it gently taut, off to one side.
- Bring the needle to the thread. Hold the needle close to the fabric, pointing away from point 1, and lay it against the taut thread.
- Wrap twice. Using your thread hand, wind the thread around the needle two times. The wraps should sit side by side on the needle, not on top of each other. Snug is right; strangled is not.
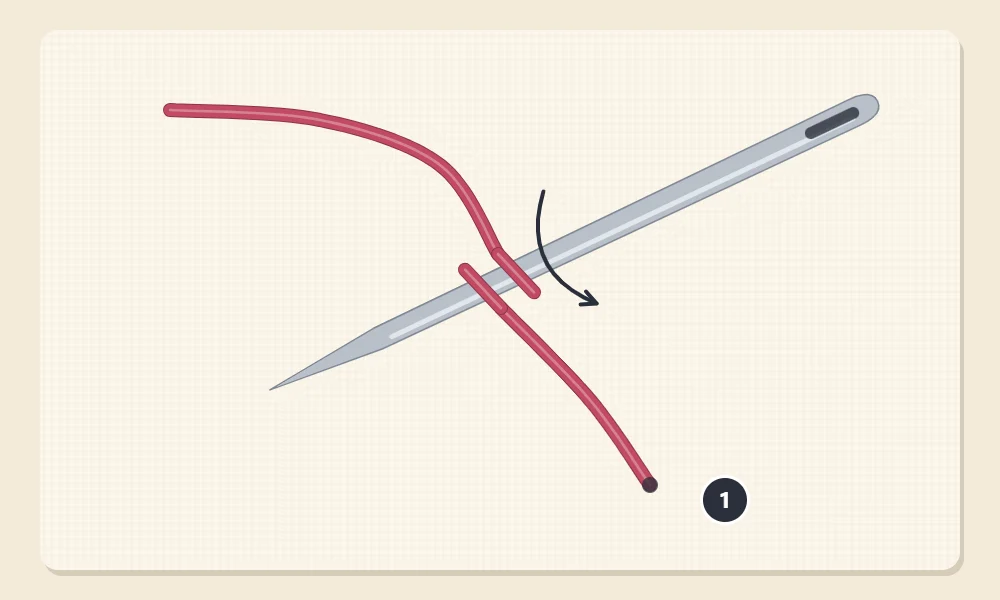
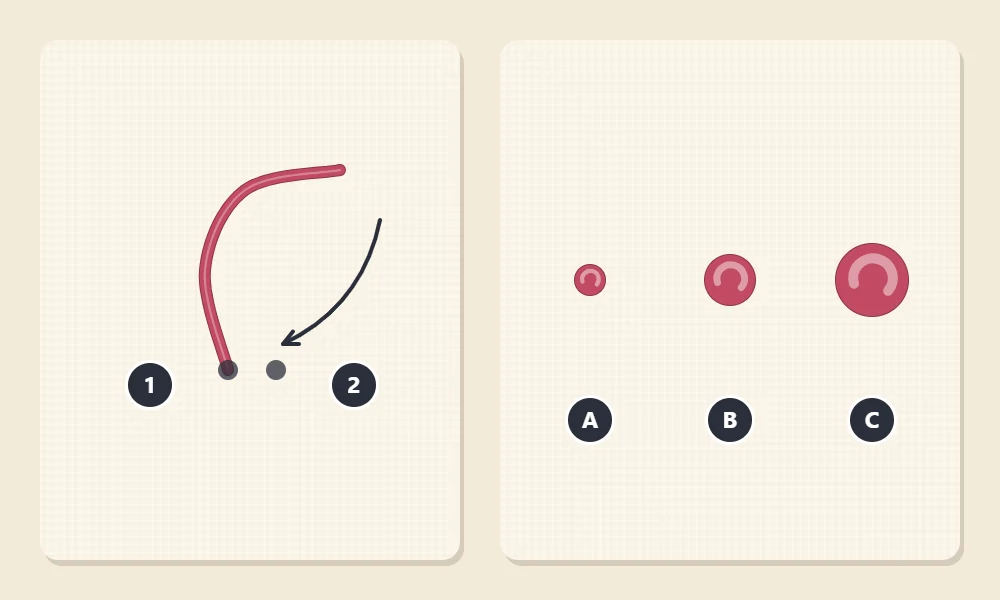
- Go down at 2. Keeping the thread taut, turn the needle tip back toward the fabric and insert it at point 2, right beside point 1 but not in the same hole. One or two fabric threads away is enough.
- Slide the wraps down. Before pushing the needle through, pull gently on the thread in your thread hand so the wraps slide down the needle and sit against the fabric in a neat little coil.
- Push through and keep holding. Push the needle to the back and pull it through slowly. Keep holding the thread with your thread hand until the last small loop is about to vanish, then let go.
- Stop when the knot sits. The knot should rest on the surface like a small bead. Do not tug once it is seated; a hard pull can drag it to the back.
Tip
If the needle refuses to pass through the wraps, do not force it. Ease off the tension in your thread hand slightly and it will usually slide. Wraps wound too tightly are the most common cause of a stuck needle.
Why Point 2 Must Not Be Point 1
The knot stays on the surface only because a tiny bridge of fabric sits between where the thread comes up and where it goes down. That bridge is what the coil rests on. If the needle goes back into the very same hole, there is nothing underneath the knot, and one pull sends it straight through to the back.
Controlling Knot Size
Two things set the size of a French knot: how many times you wrap and how many strands are in the needle. Knots A, B and C in the diagram are made with one, two and three wraps. One wrap gives a small, flat dot. Two wraps give the classic round knot. Three wraps give a taller knot, but it is more likely to lean or loosen, so many stitchers stay at one or two wraps and change the strand count instead.
| Strands | Wraps | Result | Good For |
|---|---|---|---|
| 1 | 1 or 2 | Tiny dot | Eyes on small figures, fine speckles |
| 2 | 2 | Small round knot | Flower centers, lavender, berries |
| 3 | 2 | Medium knot | Buds, textured fillings |
| 6 | 1 or 2 | Large, chunky knot | Bold dots on larger designs |
Treat the table as guidance. Fabric, floss and how firmly you hold the thread all shift the result, so stitch a few test knots in a corner before working on the real design.
Common Problems and Their Causes
The Knot Pulls Through to the Back
The needle went down in the same hole it came up through, or the weave is too open for the size of the knot. Move point 2 a little farther from point 1, or add a strand.
A Loose Loop Sits Beside the Knot
The thread hand let go too soon, or the wraps were not slid down to the fabric before the needle went through. Hold on until the very end of the pull.
The Knot Has a Tail or Looks Lopsided
The needle was held too far from the fabric while wrapping, so slack gathered below the wraps. Keep the needle low, as in the first diagram, and tighten the wraps against the fabric before pushing through.
The Thread Knots Itself on the Way Through
The thread is too long or has become twisted. Let the needle dangle so the floss can untwist, and cut a shorter length next time. General advice on how tight embroidery stitches should be applies here too.
Watch out
A finished French knot is hard to unpick. If one goes wrong, it is usually cleaner to snip it carefully from the front with fine scissors, pull out the pieces and re-stitch, taking care not to nick the fabric.
Moving Between Knots
Knots that sit close together, such as a flower center or a lavender head, can be worked one after another with the thread carried across the back. For knots more than about half an inch (1.3 cm) apart, end the thread and start again, especially on pale fabric, because a carried thread can show through as a shadow.
Where French Knots Earn Their Place
- Flower centers. One knot, or a cluster of three to five, in the middle of petals made with lazy daisy stitch.
- Buds and berries. Scattered along a stem, as in a simple floral wreath.
- Textured fillings. Knots packed closely together fill a shape with a nubbly surface; this works for sheep, clouds and tree blossom.
A Five-Minute Practice Drill
Draw a row of ten pencil dots about a quarter inch (6 mm) apart. Work a two-strand, two-wrap knot on every dot, saying the sequence to yourself: up, hold, wrap, down beside, slide, pull. By the tenth knot your thread hand usually knows when to let go. Then repeat the row with one wrap and with three strands, and compare the sizes. Row 6 of the first embroidery sampler is exactly this exercise.
Frequently asked questions
How many times should I wrap the thread for a French knot?
Two wraps is the usual choice and gives a round, stable knot. One wrap makes a smaller dot, and three wraps make a taller knot that is more likely to loosen, so for bigger knots it is often better to add strands instead.
Why does my French knot disappear through the fabric?
The needle most likely went back down in the same hole it came up through. Insert it one or two fabric threads away so the knot has a small bridge of fabric to sit on, and use a tighter weave or a thicker thread if the fabric is very open.
Which needle is best for French knots?
A milliner needle is commonly used because its eye is about the same width as its shaft, so the wraps slide over it smoothly. A regular embroidery needle also works if you keep the wraps snug rather than tight.
Can I make French knots without a hoop?
It is possible, but much harder for a beginner. Taut fabric in a hoop keeps the surface steady and leaves one hand free to hold the thread, which is what makes the knot form cleanly.