Embroidery Needles Explained: Types and Sizes
Embroidery, tapestry and milliner needles each do a different job, and their sizes run backward: the higher the number, the finer the needle. Here is how to match a needle to your strand count.
A needle that fights you on every stitch is almost always the wrong size or the wrong type, not a sign that you are doing something wrong. Hand-embroidery needles differ in three ways that matter: the point (sharp or blunt), the eye (long, large or small) and the thickness of the shaft. Once you know what each of those does, picking a needle takes a few seconds.
The Three Needle Types Worth Knowing
Needle packets carry many names, but a beginner only needs to recognize three. They are shown side by side below, lettered A, B and C.
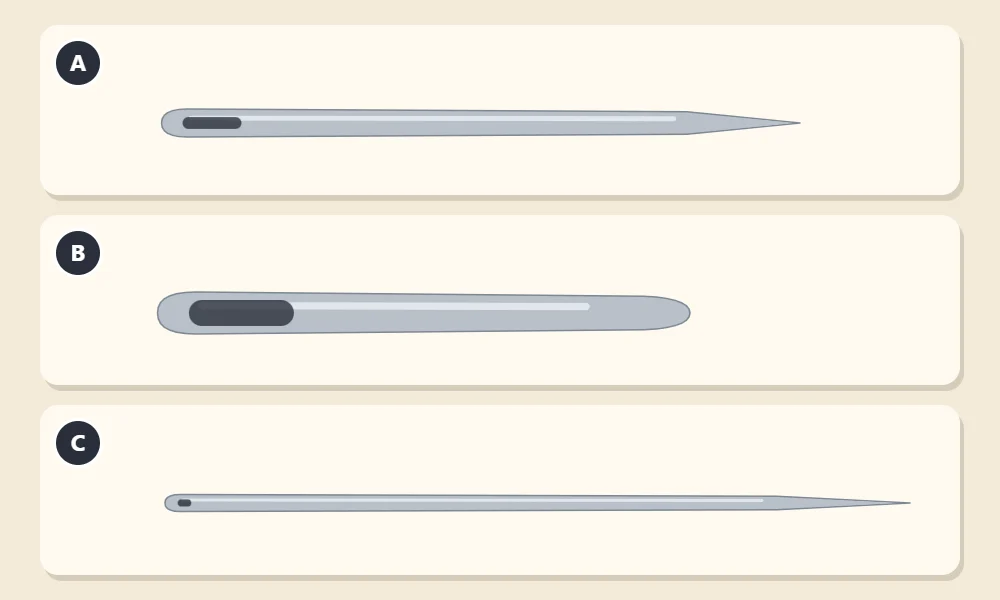
A: Embroidery (Crewel) Needles
This is the needle for nearly all surface embroidery. It has a sharp point that pierces woven fabric cleanly and a long oval eye that makes room for several strands of floss. “Embroidery needle” and “crewel needle” are two names for the same thing. If you only keep one type in your kit, keep this one.
B: Tapestry Needles
A tapestry needle has a blunt, rounded tip and a large eye. The blunt tip slides between threads instead of piercing them, which is why it is the standard needle for counted work on open, grid-like fabric. In surface embroidery it earns a place for any step where the needle travels under stitches rather than through the fabric: the wrapping pass of a whipped running stitch, woven stitches, and weaving thread tails into the back of your work. A sharp needle tends to split the stitches it passes under; a blunt one glides past them.
C: Milliner Needles
Milliner needles, also sold as straw needles, are long and thin with a small round eye. The key feature is that the eye is barely wider than the shaft. On an ordinary embroidery needle the eye bulges, so wraps of thread that fit the shaft get stuck at the eye. On a milliner needle the wraps slide off smoothly from end to end. That makes it a real help for French knots and for other stitches where the thread is wound around the needle several times. The small eye is harder to thread, so use it for those stitches and go back to type A for the rest.
| Type | Point | Eye | Best For |
|---|---|---|---|
| A: Embroidery (crewel) | Sharp | Long oval | General surface stitching on woven fabric |
| B: Tapestry | Blunt | Large | Counted work, whipping and weaving under stitches |
| C: Milliner (straw) | Sharp | Small and round | Knots and other wrapped stitches |
How Needle Sizes Work
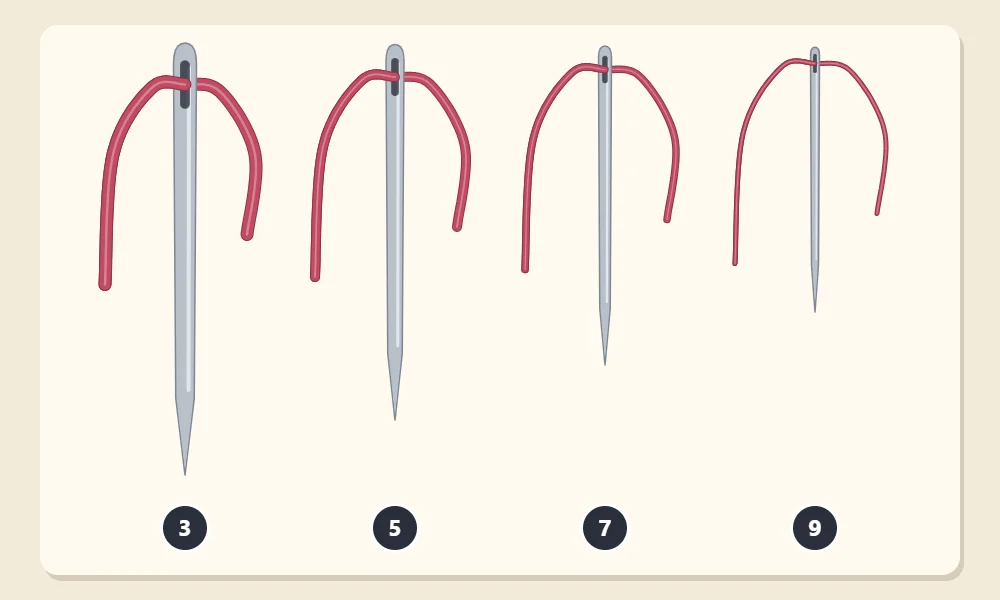
Needle sizing runs backward from what most people expect: the higher the number, the finer the needle. A size 3 embroidery needle is thick with a big eye; a size 9 is slim with a small eye. Embroidery needles usually come in sizes from about 1 to 10 or 12, and mixed packets often cover a middle range such as 3 to 9 or 5 to 10.
The numbers only compare needles of the same type. Tapestry needles use their own, higher range of numbers (commonly in the 20s for embroidery use), so a size 24 tapestry needle is not finer than a size 9 embroidery needle in any way that matters. The rule inside each family stays the same, though: bigger number, thinner needle.
Matching the Needle to Your Strand Count
The needle has one job besides carrying thread: it opens a hole in the fabric just big enough for the thread to follow without scraping. So the more strands you stitch with, the thicker the needle should be. If you have not divided floss before, read how to separate embroidery floss first, because the strand count decides everything below.
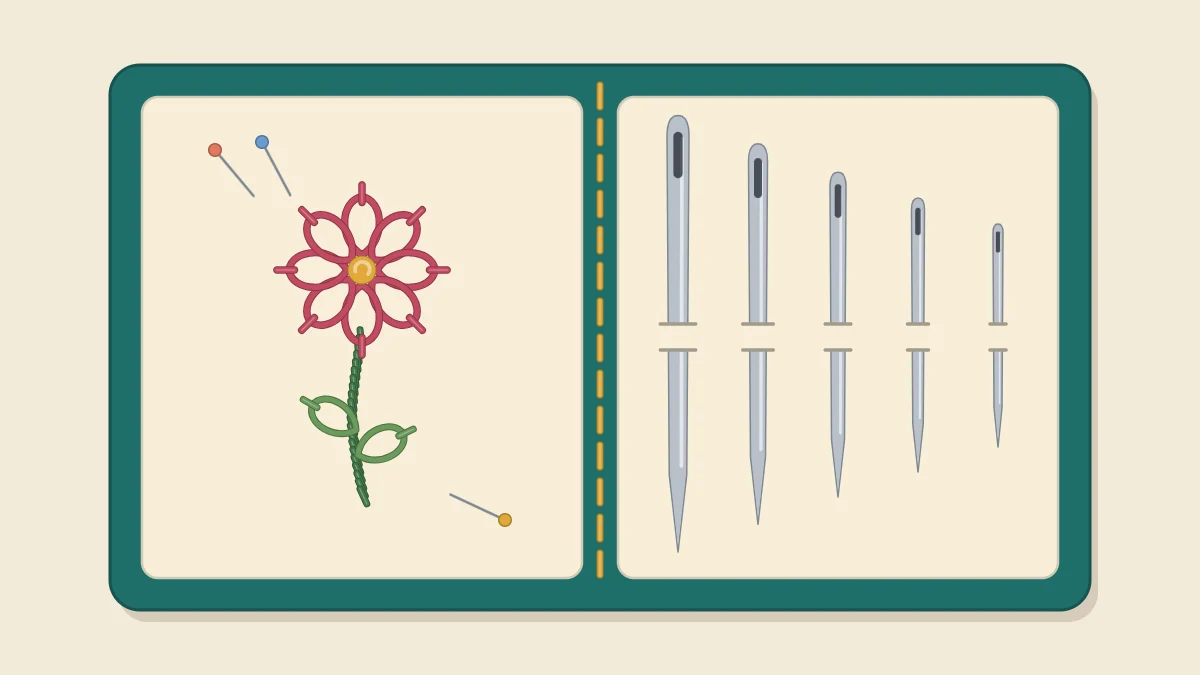
These pairings use the four sizes in the picture and are a good starting point, not a fixed rule. Fabric weight and personal preference shift them by a size either way.
| Strands of Six-Strand Floss | Embroidery Needle Size to Try |
|---|---|
| 1 strand | About size 9 |
| 2 to 3 strands | About size 7 |
| 3 to 4 strands | About size 5 |
| 5 to 6 strands | About size 3 |
Most beginner patterns call for two or three strands, so a needle around size 7 will cover a lot of your early stitching. A mixed packet is the practical choice because it lets you move up or down a size when something feels off.
Tip
Test the pairing on a corner of your fabric. Thread the needle, take one stitch and listen. A needle that is the right size passes through quietly with light resistance. A loud “pop” or a hard tug means the needle is too fine for that thread.
Signs You Are Using the Wrong Needle
Your stitching will tell you when the needle and thread do not match. Common signs:
- You have to yank the thread through. The needle is too fine, so the hole is too small for the doubled thread at the eye. Go up a size (a lower number).
- The floss turns fuzzy or frays near the eye. Also a too-fine needle: the fabric is scraping the thread on every pass. A thread that is too long makes this worse.
- Visible holes stay in the fabric around each stitch. The needle is too thick for the thread or for a fine fabric. Go down a size (a higher number).
- Threading is a struggle every time. The eye is too small for your strand count. A larger needle or the fold method in how to thread an embroidery needle usually solves it.
- The thread keeps slipping out of the eye. The eye is too big for a single fine strand. Switch to a finer needle.
- The needle snags or drags on plain fabric. It may be bent, or the point may have a burr. Replace it.
A mismatched needle is one of the quieter items on the list of common embroidery mistakes, because the stitches still form. They just take more effort and look rougher than they should.
Looking After Your Needles
Needles are inexpensive and do wear out. The plating can dull or the point can blunt over time, and a slightly bent needle makes it harder to place stitches accurately. When a needle feels sticky, looks discolored or no longer runs straight, retire it.
Store needles where you can see them: pinned through a scrap of felt, in a needle book or in a small lidded case. Keeping them sorted by size saves guesswork later, since the size is not marked on the needle itself. If they do get mixed up, lay them side by side and compare thickness; the differences are easy to see next to each other.
Watch out
Count your needles when you start and when you finish, and never park one in a sofa arm or on the carpet. Keep needles out of reach of young children and pets, and wrap old ones in tape or paper before throwing them away.
A Simple Starting Set
You do not need a drawer full of needles to begin. One mixed packet of embroidery needles covering roughly sizes 3 to 9 handles one strand through six. Add a tapestry needle or two when you first try a whipped or woven stitch, and a milliner needle when knots become part of your patterns. Everything else on the shelf is a refinement you can explore later, alongside the rest of the embroidery tools for beginners.
Frequently asked questions
What size needle should I use for two strands of floss?
An embroidery needle around size 7 is a good starting point for two or three strands. If the thread drags through the fabric, move to a slightly thicker needle with a lower number.
Is a crewel needle the same as an embroidery needle?
Yes. Both names describe a sharp-pointed needle with a long oval eye, and packets may use either one.
Can I use a regular sewing needle for embroidery?
You can for a single fine strand, but the small round eye of a general sewing needle is hard to thread with floss and can wear the thread. An embroidery needle has a longer eye made for several strands.
How often should I replace an embroidery needle?
There is no fixed schedule. Replace a needle when it is bent, discolored, or starts to drag or snag on fabric that it used to pass through smoothly.