How to Separate Embroidery Floss Without Tangles
Six-strand floss is made to be divided, but pulling it apart the wrong way knots it instantly. Cut a forearm length, pull one strand straight up at a time, then recombine the strands you need.
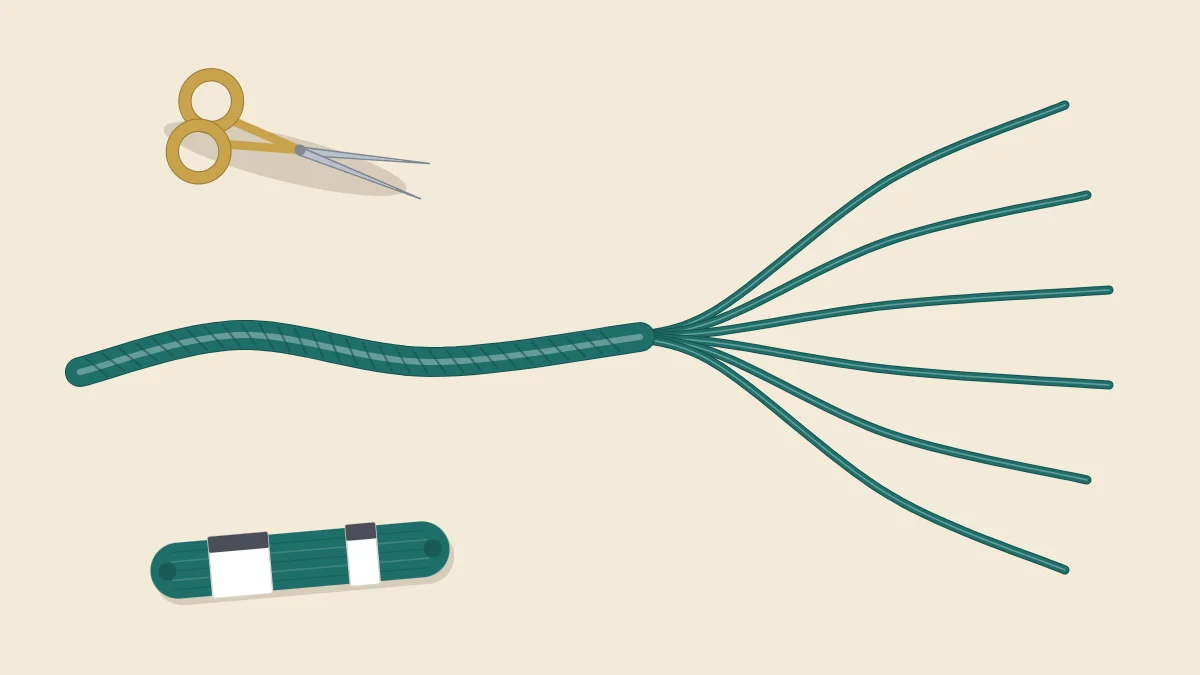
Look closely at the cut end of a length of embroidery floss and it fans into six thin strands. That is by design. Stranded cotton is made to be taken apart, so one skein can stitch a hair-fine line or a bold, raised one depending on how many strands go through the needle. The catch is that pulling the strands apart the obvious way, by peeling the bundle in two, twists it into a knot within seconds.
There is a method that does not tangle, and it takes a few seconds per strand.
What Six-Strand Floss Is
Standard cotton embroidery floss is six strands lying loosely side by side. The strands are only lightly twisted around each other, so they slide apart easily when handled the right way. Each strand is itself made of two finer plies twisted together. Those plies stay as they are: a single strand is the smallest unit you stitch with.
Patterns state how many strands to use for each part of a design, usually between one and six. If a pattern says “2 strands,” it means two of the six, not two full lengths of floss. Other threads, such as perle cotton, are twisted so they cannot be divided; the embroidery floss guide covers the differences.
Cut a Manageable Length First
Separate floss only after cutting it from the skein. A convenient length is about the distance from your fingertips to your elbow, roughly 18 inches (45 cm). That is long enough to stitch for a while and short enough to stay under control.
Longer lengths cause two problems. They are harder to separate, because there is more thread to twist up as the strand comes out. And they wear out as you stitch: every pass through the fabric rubs the thread, so the last few inches of a very long length turn fuzzy and dull before you reach them.
How to Separate One Strand at a Time
The rule that prevents tangles is simple: take out one strand at a time, and pull it straight up. Even if you need three strands, remove them one by one and put them back together afterward.
- Hold the cut length near one end between the thumb and forefinger of one hand, with about half an inch (1 cm) of floss sticking up above your fingers. Let the rest hang down freely.
- Tap or roll the short end with a fingertip so the six strands fan apart and you can see each one.
- With your other hand, pick out a single strand by its tip.
- Pull that strand straight up, slowly and steadily, keeping a light grip on the bundle with your first hand. The remaining strands will bunch up below your fingers. This looks alarming and is completely normal.
- Keep pulling until the strand comes free. Lay it flat on the table.
- Run your fingers down the bunched strands, or simply let them hang. They drop back into a straight bundle with no knot.
- Repeat for each strand you need.
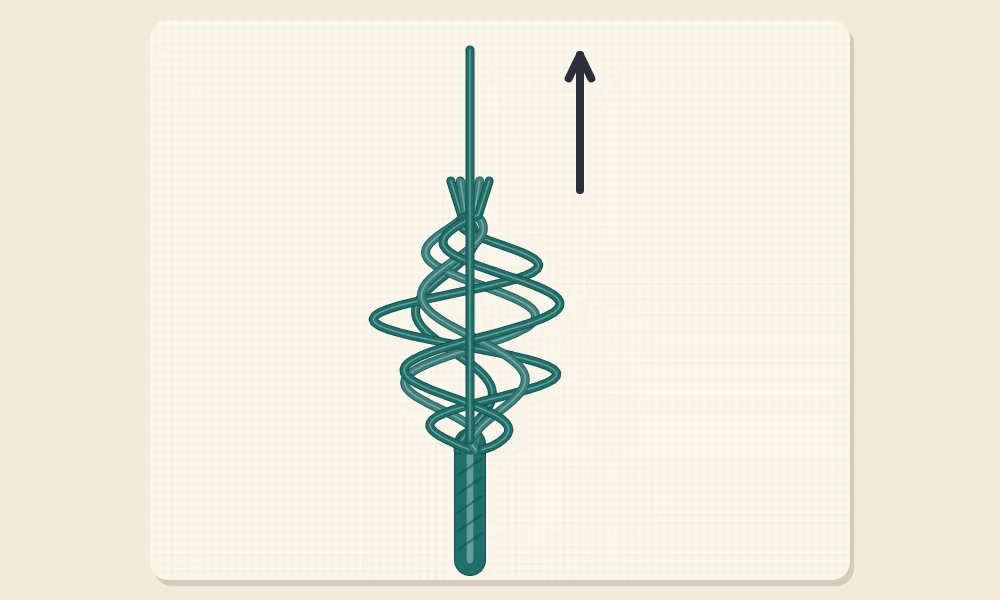
The grip matters. Hold the bundle firmly enough that it does not come up with the strand, but loosely enough that the strand can slide through your fingers. If the strand resists, stop, smooth the bunched strands downward and continue.
Watch out
Do not split the bundle into two groups and pull them apart sideways. The groups spin around each other as they separate and lock into a tight twist partway down the length.
Putting the Strands Back Together
When you need more than one strand, lay the separated strands side by side on the table with their ends level, then pick them up together and run them once between your fingers. Thread them through the needle as a group.
It can seem pointless to take strands apart only to combine them again, but it changes how the thread behaves. Strands that come off the skein together are twisted around one another. Strands that have been separated and recombined lie parallel, so they spread out on the fabric, cover more surface and look smoother. The difference is clearest in filling stitches such as satin stitch, where flat, even coverage is the whole point.
Once the strands are grouped, threading them is the next small hurdle. A fold pushed through the eye works better than a loose end, as shown in how to thread an embroidery needle.
How Strand Count Changes the Line
The number of strands is the main control you have over how heavy a stitch looks. The diagram shows the same line of backstitch worked four ways.
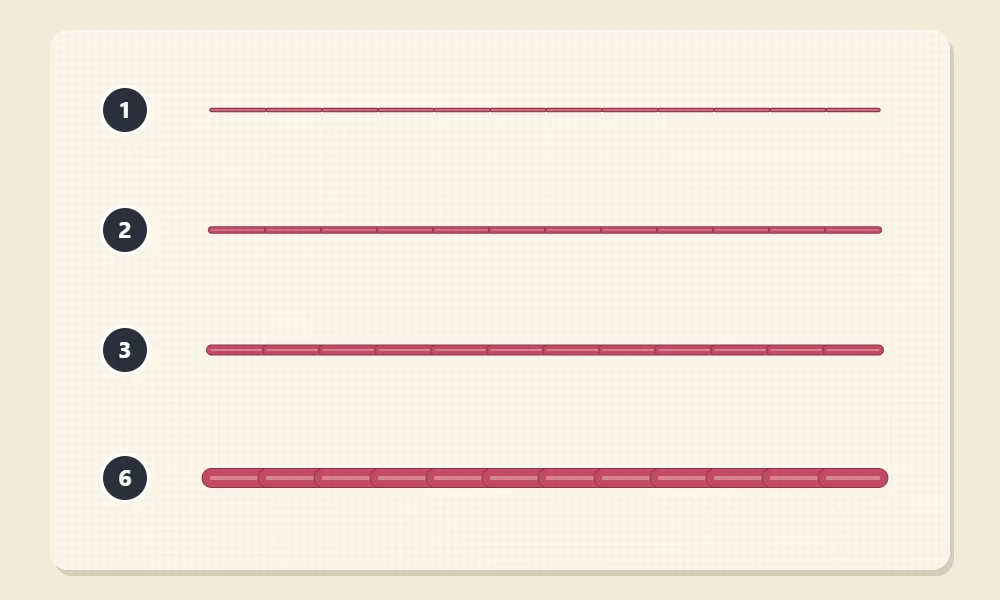
| Strands | How It Looks | Typical Uses |
|---|---|---|
| 1 | Very fine, delicate line | Tiny details, small lettering, fine outlines |
| 2 | Clear, light line | General outlines, small fills; a common default |
| 3 | Medium, slightly raised line | Bolder outlines, stems, larger motifs |
| 6 | Thick, textured line | Chunky lines, large knots, bold designs on sturdy fabric |
These are guidelines, not rules. If the pattern gives a strand count, follow it. If it does not, two or three strands are a good starting point for a line stitch such as backstitch. Scale matters too: a small design usually looks better with fewer strands, because thick thread blurs tight curves and small shapes.
The needle has to change with the thread. More strands need a larger eye, and a needle that is too fine makes the thread drag and fray as it passes through the fabric. The embroidery needles guide explains how sizes match strand counts.
What to Do With Leftover Strands
Taking two strands from a length leaves four behind. Keep them together and use them for the next length of the same color. A few simple habits stop leftovers from turning into a tangle:
- Drape spare strands over the edge of the table or the arm of a chair instead of dropping them in a heap.
- For longer storage, wind them loosely around a piece of card and note the color number from the skein band on it.
- Use up leftovers before cutting a new length, so partial bundles do not pile up.
Tip
If the thread starts to twist while you stitch, let the needle hang freely from the fabric for a moment. The thread unwinds, and the strands lie side by side again.
Frequently asked questions
Do I always have to separate embroidery floss?
Only when a design calls for fewer than six strands, which is most of the time. Even when using all six, separating and recombining them makes the thread lie flatter and smoother.
Why does my floss knot up when I pull the strands apart?
It usually happens when several strands are pulled at once or the bundle is split sideways. Pull a single strand straight up while holding the rest loosely, and work with a length no longer than about your forearm.
Can I separate a single strand any further?
No. Each strand is made of two fine plies twisted together, and untwisting them weakens the thread. One strand is the finest thread you stitch with.
What should I do with the strands I did not use?
Keep them together and use them for your next length of that color. For longer storage, wind them loosely around a piece of card labeled with the color number.