Best Fabric for Embroidery: What Beginners Should Start With
A medium-weight woven cotton or cotton-linen blend in a light color is the easiest fabric to learn embroidery on. Here is how weave, weight and stretch affect your stitches.
Hold a piece of fabric up to a window and pull it gently between your hands, first one way and then the other. If it barely gives, feels smooth, and you can only just make out the threads crossing each other, you are probably holding a good embroidery fabric. That quick test says more than any label, because what matters for hand embroidery is how the cloth is constructed: its weave, its weight and whether it stretches.
What Makes a Fabric Easy to Stitch On
Four qualities make the difference for a beginner:
- Woven, not knitted. A woven fabric is stable. It stays where the hoop puts it.
- A fairly tight, even weave. The threads of the cloth support each stitch and let you put the needle exactly where you want it.
- Medium weight. Sturdy enough to carry the thread without wrinkling, thin enough for the needle to pass through easily.
- Natural fiber. Cotton, linen and blends of the two take a needle well, hold a crease-free tension in the hoop and press nicely afterward.
Three Weaves Compared
A: Tight, Even Weave
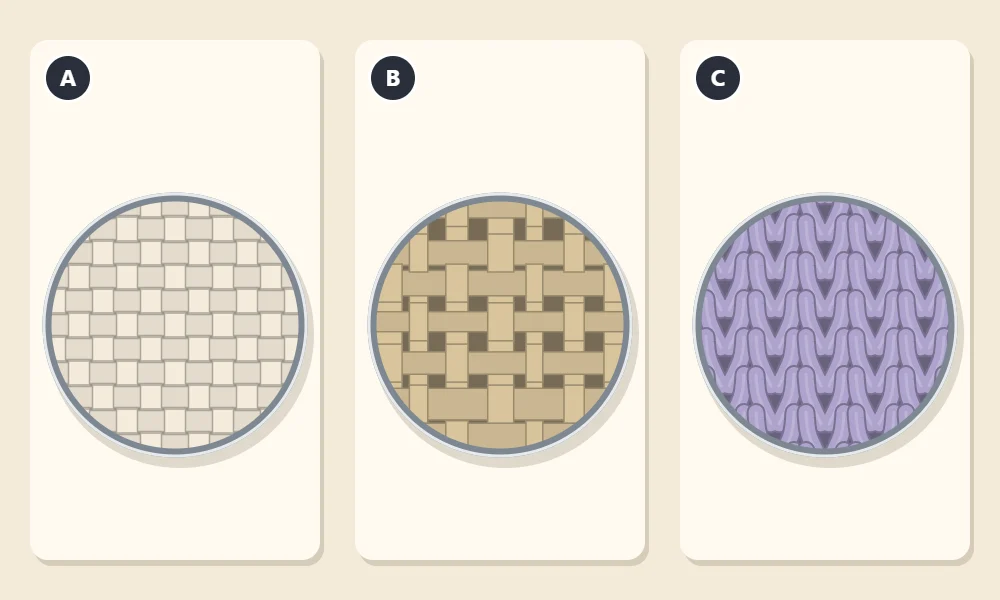
Swatch A shows the structure of quilting cotton: fine threads crossing over and under each other in a close, regular grid. Because the threads sit so close together, the needle can go in almost anywhere, which makes smooth curves and small details much easier. It is widely available in plain colors, stays put in a hoop and is the most forgiving fabric to learn on.
B: Looser, Slightly Irregular Weave
Swatch B is linen. Its threads are thicker in some places than others and the gaps between them are a little larger. That texture is a big part of linen’s appeal, and linen and cotton-linen blends are classic embroidery grounds. The looser weave asks slightly more of you: the needle tends to slip into the gaps between threads rather than exactly where you aim, so very fine detail takes more care. A cotton-linen blend gives much of the look with a more even surface, which makes it a good second fabric once quilting cotton feels comfortable.
C: Knit Fabric
Swatch C is stretch jersey, the fabric of T-shirts. It is not woven at all; it is made of interlocking loops, and loops stretch. That causes two problems. In the hoop the fabric stretches as you tighten it, and when you take it out it springs back, gathering up around stitches that were worked at the stretched size. And as you stitch, the pull of the thread distorts the loops. Embroidering knits is entirely possible, but it normally calls for a stabilizer on the back and a light touch. It is a poor place to learn, so save the T-shirt for later.
| Fabric | Structure | For a Beginner |
|---|---|---|
| A: Quilting cotton | Tight, even weave | Easiest starting point |
| B: Linen or cotton-linen blend | Looser, slightly irregular weave | Very good, with a little more care on fine detail |
| C: Stretch jersey | Knit loops that stretch | Difficult; best left until later |
Why Weight Matters
Weight is how heavy and dense the cloth is. Too heavy, as with thick canvas or denim, and pushing the needle through becomes tiring. Too thin is the more common beginner problem, and it shows up in two ways.
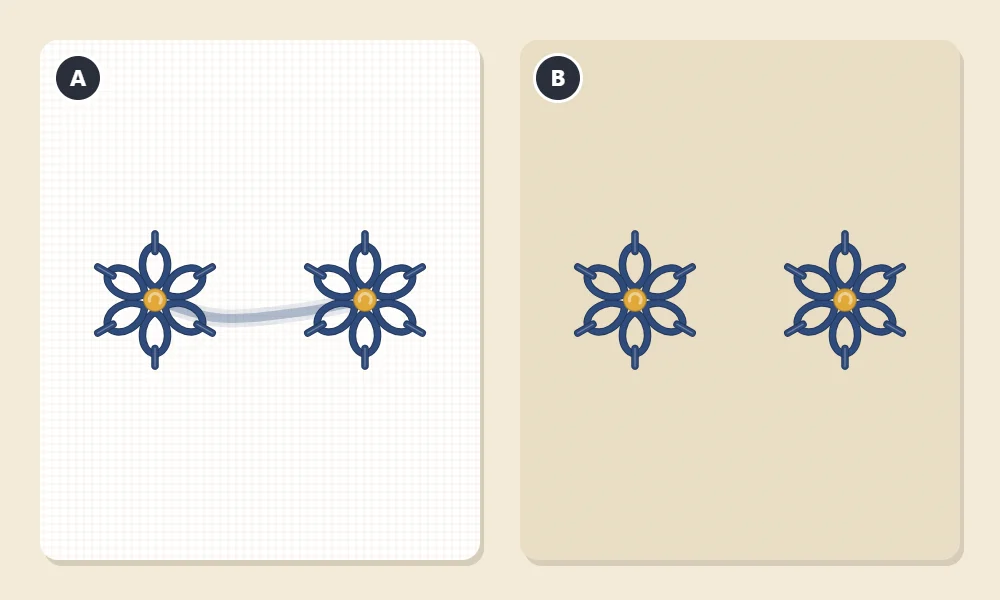
First, thin fabric lets the back of your work show from the front. In swatch A, a dark thread was carried across the back from one motif to the next, and it is visible as a shadow line. Knots and thread tails show the same way. On the medium-weight fabric in swatch B, the same thread path is hidden. Second, thin fabric has little body, so it wrinkles easily under the pull of the stitches. If that has already happened to a piece, see how to fix puckered embroidery.
Tip
To judge weight without any numbers, lay the fabric over your hand. If you can clearly see the outline of your fingers through a single layer, it is on the thin side for embroidery. You can still use it by doubling it or backing it with a second layer of plain cotton and hooping both together.
Choosing a Color
Start with a light, solid color: white, cream, oatmeal or a soft pastel. There are practical reasons for this. Pattern lines are easy to see, and you can trace a design straight through the fabric against a window. Dark fabric needs a different transfer method, which is explained in how to transfer an embroidery pattern. Light fabric also shows every floss color clearly, so you can judge your stitches as you go.
Avoid busy prints at first. A printed pattern competes with the stitching and hides your guide lines.
Should You Prewash?
Cotton and linen can shrink the first time they are washed, and some fabrics are sold with a finish that makes them feel stiffer than they really are. If the finished piece is something that will be laundered, such as an embroidered tea towel, a napkin or clothing, prewashing is the usual advice: if the fabric shrinks after you have stitched on it, the cloth tightens up while the thread does not, and the embroidery can wrinkle.
Wash the fabric the way the finished item will be washed, following its care label, let it dry and press it flat before you transfer the design. For a piece that will stay in a hoop on the wall and never be washed, prewashing is optional, though a quick press to remove fold lines is always worthwhile. Take ordinary care with a hot iron and keep it away from children.
Later washing of the stitched piece is a separate topic with its own cautions, covered in how to wash and iron hand embroidery.
How Much Fabric to Cut
Cut a square, and cut it bigger than the hoop. A good starting point is the hoop’s diameter plus about 2 inches (5 cm) on every side, which works out to the hoop size plus 4 inches (10 cm) overall. For a 6-inch (15 cm) hoop, that is a square of about 10 inches (25 cm).
The margin does real work. It gives you something to hold and pull while you tighten the hoop, it keeps the edges from slipping out of the rings, and it leaves enough cloth to gather at the back if you finish the piece in its hoop. Cut along the grain, parallel to the threads of the weave, so the fabric sits straight when you follow the steps in how to put fabric in an embroidery hoop.
Watch out
Woven fabric frays at cut edges as you handle it. On a small piece this is rarely a problem, but for a longer project, trim the loose threads rather than pulling them, so the margin does not shrink as you work.
Frequently asked questions
Can I embroider on an old cotton sheet or pillowcase?
Yes, as long as it is woven cotton without stretch and not worn thin. Check it against your hand: if your fingers show clearly through one layer, back it with a second layer of plain cotton.
Is linen too hard for a first embroidery project?
Not too hard, just slightly less forgiving. Its looser weave makes very fine detail trickier, so many beginners start on quilting cotton or a cotton-linen blend and move to linen next.
Do I have to prewash fabric before embroidering?
It is the usual advice for anything that will be laundered, because cotton and linen can shrink. For a piece that will stay in a hoop on the wall, prewashing is optional.
Can I embroider on dark fabric?
You can, but tracing the design is harder because you cannot see through it. Light fabric is simpler while you are learning.